

This was the most exciting week of my bread-baking life. I feel like I've been let into a secret world where fresh, rustic, crusty bread exists just for the taking.
 This is all thanks to the book Tartine Bread, written by Chad Robertson. He who owns Tartine bakery in San Francisco with his pastry chef wife. Awesome.
 I am so enchanted by his bread baking journey. He apprenticed with artisan bakers in both the US and France, stoking wood-fired ovens and tweaking and developing his bread until he came up with what some people say is the best bread in the United States. Apparently Tartine Bakery sells out of bread within an hour of baking every single day. I would really love to apprentice to a small-operation baker with a wood oven sometime in the next year or two.
Like many sourdough breads, the bread is 100% naturally leavened (no commercial yeast), but unlike sourdough, Tartine Bread is made with a "young" started, one that hasn't developed a very sour flavor. This bread has the rustic appearance, crispy crust, and a lovely spongy inside full of big holes that I've been searching for ever since I started making bread over a year ago. This isn't gimmicky make-it-in-five-minutes bread, it's the real deal. From start to finish, it takes around 20 hours to make, not to mention feeding your starter every day. I've kept my starter since last April, but I was keeping it in the refrigerator and only feeding it once a week. Keeping it on the counter and feeding it every day has made all the difference in the flavor and leavening power.

Here's how to make the best bread of your life....you'll need some sort of pot with a lid that can go in the oven, ideally a cast iron pan with fitted cast iron lid. I have the pan but not the lid, so I invert a glass pie-plate over my pan. You'll bake the bread in this chamber to help retain heat and mostly to retain steam that will create a good crust and facilitate expansion during baking.
I'm going to assume you have a starter that you feed. If you don't, check out this Peter Reinhart recipe- here, here and here. Martha Stewart also did a spread on Tartine Bread, and all the instructions are in her article here. The main thing is that the starter has to have enough strength to make your bread rise, so you should be leaving it covered at room temperature and feeding it every day. When you feed it, discard (or give away) about 80% (for me this leaves about 1/4-1/2 cup in the bottom of the bowl), and then feed it with a 50/50 mix of whole wheat and flour mixture (for me this is 1/2 cup of each), and an equal amount of cool water (1 cup). Mix thoroughly and re-cover the bowl.
This is what my starter looks like just before I feed it every day: Separated and strong smelling.

This is what it looks like right after I feed it:

This is what it looks like after a few hours:

So once you've got a really vivacious starter on your counter, you can make the leaven (what will make your dough rise.) You should do this the night before you want to make the dough, because it needs 8-12 hours to mature (depends on the temperature and strength of the wild yeast). To make sure the flavor of your bread isn't too sour, you don't want your leaven to be too mature, meaning the wild yeast in the leaven hasn't eaten all the new food you gave it. So to make sure this leaven is "young" when you want to use it, you use a very small ratio of starter to food so it can snack all night and be strong but not sour.
CREATE THE LEAVEN 8-12 HOURS BEFORE YOU WANT TO BAKE: Mix 1 tablespoon starter with 200 grams warm water and 200 grams of 50/50 flour blend. Cover with a kitchen towel and allow to rise at about 65 degrees over night.
My leaven after about 10 hours:

Test to see whether your leaven is ready by scooping up a small spoonful and dropping it into a glass of water. If it floats- its ready! If it sinks- give it some more time. Careful not to degas the little piece when you do this- if you do it won't float even if its ready.
Not ready:

Ready!

It's best to use this leaven before it's over-ripe, or too mature. It should smell sweet and almost like wine, but not like vinegar. If it does smell vinegary, discard half and replace with 100 grams of water and 100 grams of 50/50 flour blend. Check it again in 2 hours.

It's time to mix the dough.
DOUGH AMOUNTS:
Warm water (abotu 80 degrees) 700 plus 50 grams
Leaven 200 grams
White Flour 900 grams
Wheat Flour 100 grams
Salt 20 grams.
MAKE THE DOUGH:
Combine the water and the leaven. Squelch the leaven with your hand to mix it into the water. Make sure you've still got some of your starter left somewhere- you need to keep feeding that for future uses.

Add the flour and mix thoroughly into the water mixture.

Make sure there are no bits of flour left. Now you must let the dough rest for 25-40 minutes before you add the salt and the rest of the water. This "autolyse" helps the flour absorb the water, relax the gluten and develop the dough. Very important, so don't skip it.

After the rest period, sprinkle in the salt and the water, and mix thoroughly. The dough will seem to separate and then come together in a sticky lump.
Now starts the BULK RISE, where the dough develops much of its strength and flavor. It will last 3-4 HOURS. Cover the bowl and keep in a warm place, preferably around 80 degrees. To achieve this temperature in the winter, I put my pizza stone in my oven and turn it on for a few minutes. After I turn it off and when its cooled down a bit I put the covered bowl in the oven on one of the racks. The stone helps retain the heat and keeps the oven an appropriate temperature. You can also put a pot of boiling water on the floor of the oven to keep it warm.
Now, you'll notice you haven't done any hardcore kneading yet. Well, sorry to disappoint, but there's none of that happening here today. Instead, develop the strength of the dough by folding it. Folding aligns the strands of gluten.
You'll FOLD the dough once EVERY 30 MINUTES for the FIRST 2 HOURs. Notice how it gets stronger, stretchier, smoother and more cohesive every time you do it. Magic, I say.

To fold, pull up the right side of the dough and plop it over the center. Pull up the left side and place it over the right. Do the same with the top and bottom. Then pick up the whole thing a turn it over so the folds you just made are now on the bottom. As you enter the third hour, you can fold less often, and also be more gentle. You want to keep some of the gas in the dough.

You'll know the dough is properly risen when it holds its shape and ridges in the bowl after you fold it. It will have increase 20-30%. At this point, its time to divide and shape the dough.

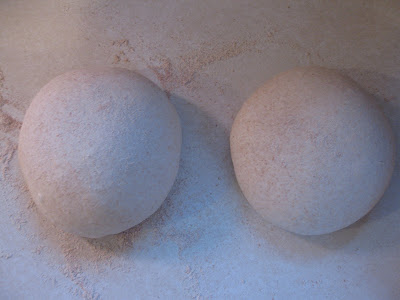
Turn out the dough on a clean (unfloured) counter. Cut it in half with a knife or bench scraper and sprinkle the tops lightly with flour. Form each half into a round shape, creating tension on the outside by folding the non-floured half onto itself. Leave the rounds on the counter, flour-side down to relax. This is the preshape. Let the dough RELAX for 20-30 MINUTES.

After the rest period, come back and do the final shape. Have a couple of bowls and kitchen towels nearby to hold the finished product. Look at your preshaped rounds: if they are all flat and drippy on the edges, the dough isn't strong enough and you should do another folding/preshape and rest before the final shaping.

For the final shape, use flour as needed but try not to get it on what will be the inside of the loaf. Keep it on what will be the crust. I used a mixture of cornmeal and whole wheat flour, but the book recommends a mix of rice flour and wheat flour.
Fold the bottom of the dough up to the middle. Repeat with the sides. Pull the top of the dough up and over the bottom, then pull the bottom part up and over, pinching it all closed on the bottom of the loaf, creating a nice round shape and a tight outer "skin."
Flour a kitchen towel and place it over a medium bowl. Place the dough round in the bowl with seam side you pinched closed facing up. Cover the dough with the flaps from the towel and LET RISE in a warm place (back in the oven) for 3-4 HOURS.

If you don't want to bake right away, you can place the dough in the fridge for up to 12 hours. This will create a slightly sour loaf.
I baked one of my loaves right away, and I left the other in the fridge over night and then on the counter for 3 hours, and I didn't notice too much difference between the two.
The dough after rising: Slightly puffy. If you poke lightly with a finger it doesn't spring back.

20 minutes before baking, place the cast iron pan and lid in the oven and preheat to 500 degrees. (Remove the dough if its in there.) After it's thoroughly heated, remove the hot pan from the over and set it on the stove. (PLEASE don't burn yourself, and remember not to grab the handle when its on the stove top!) Uncover the dough and carefully turn it out into the hot pan. Using a sharp knife, made several shallow slashes in the top of the loaf. This will help the loaf expand evenly in the oven and they look really sweet.

Place the pan back in the oven and cover it with the lid. Turn the temperature down to 450 degrees. Bake for 20 MINUTES, and then remove the lid. The bread needs a moist environment at first, but later needs dry heat. Bake for an additional 25-40 minutes until the loaf is deep golden brown and beautiful. If you want the crust to be extra crispy, bake it extra dark. Don't be timid.

Oh, the picture of loveliness! Place the bread on a cooling rack so air can circulate around it. Try not to tear into it for an hour so it can finish the baking process.
 Slice! Gasp at the gorgeous caverns and tunnels in the interior! Munch!
 This bread will last longer and taste better than breads made with commercial yeast instead of the starter.
We've been enjoying it many ways, but my favorite way to use it after day one (when I eat it straight up or with jam) is to butter a slice and fry it in a pan- the spongy bread soaks up the butter and it tastes AMAZING with jam or used for a BLT or torn up in a salad.
So admittedly it is close to midnight and I'm cutting this Friday post very, very close. But it was a long one and I wanted to do it justice, so there. Now go make some bread.
I am so glad to see this, I will have to check into making this... I am trying to make my sourdough starter work... having a hard time with it... will keep at it though :) Thanks for the inspiration!
ReplyDeleteThis might be totally weird, but I did Summerstaff with Eric a few years ago, and saw a link to your blog that he posted on facebook. And I got so pumped about this post that I had to comment. I just started using the tartine cookbook and it's so awesome!
ReplyDeleteHere's a link to my loaf.
http://www.donteatthepaintings.com/?p=209
Thank you for this detailed account of your experience with Tartine Bread. I used your post as a second reference and to reassure myself along the way. I noticed that you got a very good bulk rise. My own loaf came out a little dense (not too bad, though) and had the consistency and texture of steamed bun, which is not exactly my fav. Any advice? I figure a longer bulk rise might help, but incase you had similar issues, thought I should ask. Thanks for the post!
ReplyDeleteI may be writing this long after you are paying attention, but I want to thank you for your very good directions and pictures. I have been making all kinds of bread at home for a long time but am intrigued by the Tartine method. Until now I couldn't find directions that were as clear as yours. This will help!
ReplyDeleteThanks!
Kathy
Thank you for these detailed instructions! I tried several times and failed, but now followed your blog above, and can make the best bread ever!! Thank you:)
ReplyDeleteThanks for providing valuable information The way you explained cleared all the concepts. Definitely will be helpful for those looking for japanese sharpening stones
ReplyDelete