Sunday, October 31, 2010

October was great.


Remember the Chocolate Bread?

It made fantastic french toast. I made mine a sandwich with bananas (the perfect fruit!) and peanut butter and whipped cream.


And now, I will tell you that October was great because:

1. It finally feels like fall here in Augusta, GA.

2. It was my birthday. (Yes, the whole month- October is my birthday. Except for October 10, because that is my mom's birthday.) Poor Eric- I was raised to believe that birthdays are really, really important, so he is having to take a crash course in the whole birthday song and dance.

He did great. There was a very surprising party with pumpkin carving and fruity pebble treats and a pinata!

3. Sara and Andrew's wedding.


4. Eric and I dressed as mimes and went to a Halloween 80s dance party. We've decided to get really good at miming for next year.


5. The Farmer's Market (which I've been baking for and selling at almost every weekend since April) finished with a bang this month. Yesterday, in fact. I love baking a ton of bread and spending time at the market.


And I'm looking forward to November because:


1. Camping at Tybee Island with friends!

2. We're playing in a soccer tournament in Hilton Head, the place of our engagement.

3. Harry Potter 7 part 1 November 19! My generation grew up with HP, and I am proud to love it.

4. Thanksgiving with my family on the farm in Virginia!

5. No more farmer's market every weekend!

Fantastic Ciabatta Bread


You don't know this, but I have been trying in vain for the past few months to make a ciabatta bread that looks attractive, has a crunchy crust, and a soft interior with the large holes that make ciabatta, ciabatta. I've tried Peter Reinhart's recipe so many times. I've tried random recipes off the internet, I've tried the no-knead bread recipe, and I've tried the "Artisan Bread in 5 min a Day" recipe, all to no avail. They produce pretty tasty bread, but none with the holes I was looking for. Very frustrating, let me tell you.

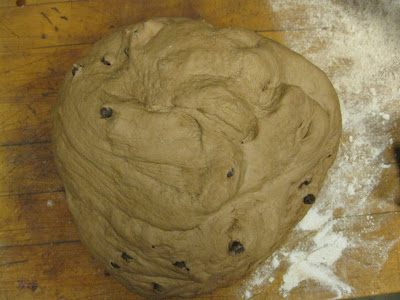
WELL, I HAVE ARRIVED. I could tell just from the dough that this recipe was the one. It was wet, but still had structure. Even when I turned it out onto the table to divide it, it didn't deflate. The dough was strong, but still developed the gas holes. Killer. Thrilling. I'm beside myself with joy. Thank you King Arthur Flour. Thank you, thank you, thank you.

In a selfish way, I'm almost reticent to share this with you, considering what I went through to get here...bu I've decided to save you pain. And King Arthur has tons of baller recipes.
I made only a few changes to this recipe, noted in the ingredients.


First, you must stir up a pre-ferment that will sit overnight, developing flavor. Mix these ingredients together and let sit for 10-15 hours until very, very bubbly.

1 1/2 cups (6 1/4 oz) bread flour or King Arthur AP flour
1 cup (8 oz) cool water
1/16 t instant yeast

When ready to mix the dough, combine the pre-ferment and the rest of the ingredients in the bowl of a mixer.

all of the starter (pre-ferment)
1 t instant yeast
1 1/2 cup (6 1/4 oz) bread flour or King Arthur AP flour
1 1/4 tsp salt
1 tsp sugar
1 tbs nonfat dry milk*
1/4 cup (2 oz) water*
2 tbs (7/8 oz) olive oil

(*instead of the dry milk and water, I just used 1/4 cup milk)

It's important you use a mixer because the dough is so soft (basically impossible to knead by hand).

These pictures show the recipe multiplied by 8

Beat at medium speed using the paddle attachment. I had to switch to the dough hook after a few minutes because the dough climbed up onto the paddle and clung there like a frightened monkey. When sufficiently mixed, the dough will be gorgeously smooth and elastic. It took more like 10 minutes in my big mixer.

Look at that gluten development! See how stretchy and shiny it is!!

Place the dough in a greased bowl and set aside to rise. After one hour, stretch each side and fold over the middle, then turn the whole thing upside-down so the seams are on the bottom.

folded dough

Let rise one more hour (two hours total rising time, with the folding in the middle)

fully risen dough

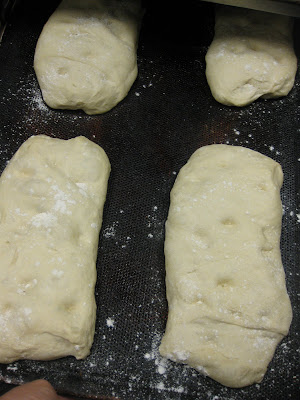
Gently turn the dough out onto a floured surface (no need to go nuts with the flour. This dough isn't as sticky and gloppy as some of the no-knead recipes).

Use a knife to divide the dough into 2 loaves, or smaller bits for sandwiches. (K.A. website says for the two loaves, you should have two fat logs, about 10"x4").

Gently transfer the dough to a baking sheet, stretching them out slightly, leaving about 4" between them.

Allow to rise for 60-90 minutes, dimpling with your fingers halfway through. You can push your fingers almost to the bottom of the loaves, the holes will fill partially back up. Preheat the oven to 425 degrees about 20 minutes before baking time.

Spritz the loaves with luke warm water (to help create steam) and bake until golden brown, about 18-20 minutes. You can also create steam by placing a rimmed baking sheet in the oven during preheat and pouring hot water onto it just before loading the loaves in the oven. Steam is necessary to facilitate proper "oven spring" (the sudden burst of yeast activity and loaf expansion when hit with the heat of the oven) and the development of a proper crust.

Great Scott this is good bread! Eric and I cut it in half lengthwise, toast it and eat bruschetta on it practically every Sunday. We're about to eat some now, in fact. Just combine diced tomatoes, minced garlic, lemon juice, olive oil and fresh chopped basil, then spread it on the toasted ciabatta bread. Add some mozzarella if you like. The crust gets crunchy and the interior stays soft. YUM.

Saturday, October 16, 2010

Flan de Naranja


I love chocolate as much as the next girl, but I promise you that I will choose desserts from the custard/pudding family first every time. The texture! I love the smooth creaminess that holds its shape but yields the second it's placed on your tongue...

The only problem is desserts of this nature are usually comprised almost entirely of cream, egg yolks and sugar. Aka, not health food as we usually define it.

Which is why, dear readers, I was positively THRILLED to find this recipe for "Orange Flan." Which is as close to health food that custard will ever venture. Which is why I bought a large bag of oranges the very next day.

In general flan, unlike creme brulee or other egg custards, is not worth eating without the caramel topping, and this orange flan is no exception. Make the caramel. It will hit your tongue first, giving way to a mysterious orange egginess. If you think this is a puzzling set of flavors, you are correct- but you'll be completely satisfied mulling them over as you take the next bite...and the next...

The custard is incredibly easy to prepare, so save your worry for the caramel, which can be tricky.

Flan de Naranja (Orange Flan), adapted from Apple Pie, Patis and Pate

Preheat the oven to 325 degrees, and get out 4 ramekins and a baking dish that will hold all of them.

Have 4 6-oz ramekins at the ready. Combine 1/2 cup sugar with 2 tablespoons of water in a sauce pot. Heat over medium-high heat, stirring only until the sugar is dissolved. Once the syrup boils, watch it carefully and swirl the pan occasionally to make sure the mixture is heating evenly. Cook until the caramel is deep amber- but be careful! It cooks some after you take it off the heat, so you may want to take it almost there and have some cool water in the sink to stick the bottom of the pot in to make sure you don't burn it. Burnt caramel is inedible.

Working quickly before the caramel hardens, pour a little into each ramekin, coating the bottom. I swirled mine to get the caramel on the sides too, but it's not necessary, and hot caramel is VERY HOT. And STICKY. And DANGEROUS. (or, because we're dealing with a Spanish dessert here- PELIGROSO!)

Make the custard:

6 large eggs
5 T sugar
1 1/3 cups fresh squeezed orange juice (about 4-5 large oranges)
1 t orange zest (from one orange)

In a large bowl, lightly beat the eggs with a fork. Try not to incorporate too much air into the eggs. Mix in the sugar, and then slowly mix in the orange juice while beating the eggs. Strain to remove pulp or seeds. Add the zest and stir.

Get out the baking dish and line with a tea towel. Place ramekins in the dish and distribute the custard mixture evenly among them. Pour hot water in the pan so it comes half way up the sides of the ramekins. This will help the flans bake evenly.

Bake in the preheated oven for 45-55 minutes until the centers are set. Once done, remove the ramekins from the water bath and let cool at room temperature. Chill in the fridge for at least an hour. Run a knife around the edges of the flans and invert onto plates to serve.

I figured it out- each flan only has about 1.5 eggs and less than 2 tablespoons of sugar. Not too shabby.

Tuesday, October 5, 2010

Pumpkin Spice Cake with Maple Cream Cheese Frosting


Hooray for pumpkin dessert season! I'm so pleased to be able to pop pumpkin muffins in my mouth every day now, telling myself they're healthy despite the chocolate chips I add liberally.

And it's great to have fall options for non-chocolate cakes at the restaurant. I'm sure sick of lemon-berry combinations. It's on to pumpkin and apples and cobblers and caramel apples and spicy things!

Also I need to figure out what tree is blooming in my yard that smells like apricots.


On a side note, this past weekend was Sara and Andrew's wedding. It was one of the very best weddings I've ever been to- so creative and delicious and visually stunning. Her mother and relatives picked and arranged the flowers themselves. They were lovely, jewel toned and wild-looking bouquets. Sara wanted a dessert spread on tree stump cake stands, so we baked non-stop from thursday to saturday and made 10 different cakes, pies and cheesecakes. Best of all, Sara and Andrew are so utterly perfect for each other, I want to hold them at arms' length and just grin at them, ending with a nice cheek pinch.

Um so anyway, this cake is very moist and spicy and divinely delicious. Make it this weekend for your favorite person.
Many, many bloggers have posted this cake, but the original is from David Leite and can be found here.

For the pumpkin cake (I made the original recipe times 1.5 to come up with a three layer cake. Here, it is already multiplied for the three layer.)

1 1/2 sticks unsalted butter, softened
1 1/2 cups dark brown sugar, packed
1/2 cup granulated sugar
3 cups cake flour
3 tsp baking powder
1 1/2 tsp baking soda
1 1/2 tsp ground cinnamon
1 1/2 tsp ground ginger
3/4 tsp ground nutmeg
1/4 tsp ground cloves
3/4 tsp salt
1/4 tsp fresh ground black pepper
3 large eggs
3/4 cup buttermilk
1 1/2 tsp vanilla
1 7/8 cup canned solid-pack pumpkin.

Preheat the oven to 350 degrees. Spray with oil and line 3 8 or 9-in round cake pans with parchment paper.

Cream the butter and the sugars in a stand mixer on low speed for about 5 minutes, until fluffy. While this is going on, sift the flour, baking powder and soda, salt and spices together in a medium bowl.

Add the eggs one at a time to the butter mixture, scraping down the sides of the bowl after each addition. Mix the butter milk and the vanilla, and alternate adding the buttermilk and the flour mixture to the butter/eggs in 5 additions, beginning and ending with the dry ingredients. Add the pumpkin and mix until smooth, scraping down the bowl as needed.

Divide the batter between the pans and smooth the top of the batter. Drop the pans onto the counter from a height of a few inches to jar out any air bubbles lurking below the surface. Bake the cakes for about a half an hour, until a knife or toothpick inserted into the center comes out clean. Cool the pans for 15 minutes and then turn the cakes out onto racks and cool completely.

Make the frosting (adapted slightly):

16 oz (two packages) cream cheese
2 sticks butter, room temperature
1 pound confectioner's sugar
1/3 cup pure maple syrup, or to taste

Beat all the ingredients with a mixer until smooth and fluffy. (add the confectioner's sugar slowly while beating).

This cake might need to be refrigerated after frosting for about 30 minutes to set before cutting. I sprinkled cinnamon on mine. Mmmmmm.

Monday, October 4, 2010

Ah, Sourdough.


this was a good loaf.

Sunday, October 3, 2010

Pane al Cioccolato


Chocolate Bread! What bliss is this?

As I drove these loaves, fresh from the oven, to the farmer's market last Saturday, my entire car filled with the most delicious melted chocolate smell. I lovingly assigned these loaves to the front of our booth; a prominent position next to the cinnamon rolls. It was very hard to stop myself from caressing the dark brown crust dusted with streaks of flour in front of the customers.

I cut a loaf open under the pretense of offering a taste to customers (but really, I couldn't help myself any longer.) And chocolate bread is exactly what this is. I know, I know, I'm being obvious here- but it wasn't so chocolately that it seemed like dessert, and it was definitely bread texture- but all chocolate taste.

Let's talk about the possibilities for chocolate bread, people:
1. Toasted for breakfast with coffee or chai. (oh, go ahead, spread on some butter.)
2. Peanut butter sandwich! (banana optional)
3. Spread with Nutella and sprinkle with berries.
4. If (unlikely) some of this bread should be left after a few days, make chocolate bread pudding!

The recipe is from an amazing blog I found called Apple Pie, Patis and Pate. The author of the blog creates amazing international dishes, and (most impressive to me) bread with beautiful irregular holes and lovely slashes.

kneaded final dough

Chocolate Bread, from Apple Pie, Patis and Pate.

Make the wild yeast starter first:
1 oz sourdough starter (50% hydration)*
1/4 cup (1.125 oz) bread flour
.625 oz water

Stir thoroughly and let ferment at room temperature for 8 hrs.

*If you need to make a sourdough started, here is a link to Peter Reinhart's instructions.)

Make the Final Dough:
All of the wild yeast starter, cut into pieces
3 cups (13.875 oz) bread flour
1 1/8 cup (8.75 oz) water
4 Tbs (2.5 oz) honey
1 Tbs vanilla
4 Tbs (.875 oz) cocoa powder
1/4 tsp instant yeast
1 Tbs (.375 oz) kosher salt
2.75 oz chocolate chips (don't add these until the end of the kneading, after the gluten is developed. Add too early, and the gluten will be inhibited and the chocolate chips will melt into the dough)

Mix everything (but the chocolate chips) together, and knead for 8-10 minutes. Rest for 5 minutes. Add the chocolate chips and knead until evenly distributed. If using a mixer, knead by hand for a minute at the end.

shaped chocolate loaves; i quadrupled this recipe

Place the finished dough in a large oiled bowl. Cover with plastic wrap and let rise for two hours at room temperature.

At the end of this time, divide the dough into two pieces, about a pound each. Shape each into a loose ball and let rest for 20-30 minutes.

Next, shape into the final loaf- either a boule or batard. (here is a nice video on batard shaping) Finally, proof at room temperature for 3 hours on the pan you plan to bake on.

partial truckload of bread for the market

About 30 minutes before the end of proofing, preheat the oven to 400 degrees. When ready to bake, take a sharp knife or a razor blade or lame, and make two or three slashes down the length of the bread. Load the bread into the oven and create steam by pouring a cup of hot water into a separate pan, or by spraying the walls of the oven with water. Bake for 35-40 minutes, rotating the loaves once. Let cool for an hour before slicing.

Chocolate Bread Madness!