Monday, April 26, 2010

Fairly unrelated to baking.

Eric and I drove down to Florida for a mini-vacation/camping trip last weekend.

We lunched in Savannah, got eaten alive by "No-see-ums," drove past Disney World and Dinosaur World (!!!), went to an airshow, danced at a REAL club (like the kind you see in the movies with confetti raining from the ceiling), saw Eric's friend Josh in Gainsville and picked strawberries, among other things.

On the first night, we stayed in Cape Canaveral National Park. Our campsite was located on an island in a lagoon and the only way to get to it was by canoe. We were to only people we saw. We had the island to ourselves. It was sick.

On our way to the island, a man in a kayak paddled up to us and said "Hey, do you want a fresh fish for dinner?" and then he handed us over a decent size trout.

Major Score. Direct Hit.


We were thrilled to have a fish.

But then we had to call Eric's sister Christine, and ask her to google "How to gut a fish" for us. We're fish n00bs. It didn't go well.


But Eric ate it any way.


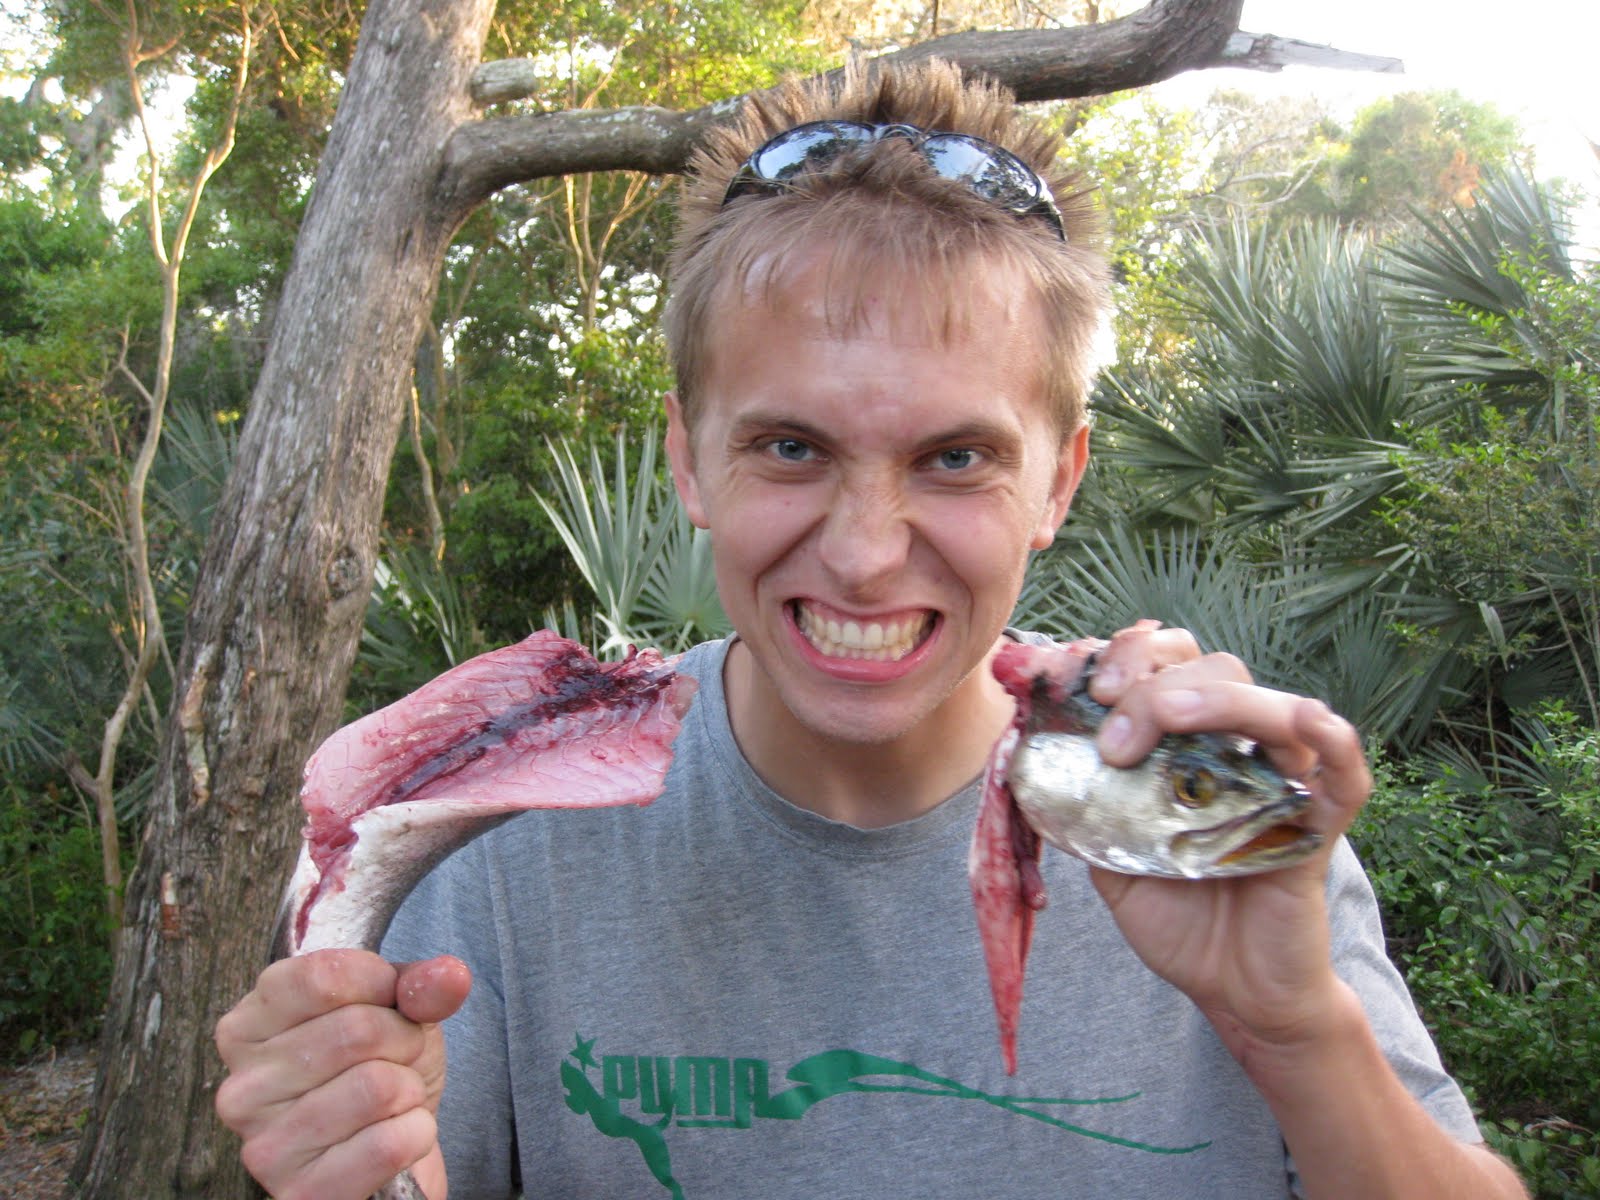
Not really. We abandoned the fish as dusk arrived and with it, approximately 100,000,000 little gnats biting the snot out of us and infiltrating our eyes and noses. I'm still scratching those dang bites.

It is a reeeeaaaalllly sweet spot though, and apparently the bugs aren't bad from October to March. During the summer, however, it's name is Mosquito Lagoon. I shudder to think of it.


Mmmmmultigrain


Oh Peter Reinhart, you are a bread god. Thank you for this multigrain bread.

Besides the taste, texture, healthfulness and cool speckly appearance of this bread, the best part is that the it requires no pre-ferment, only a soaker. All you have to do is mix up some various grains and water the night before. Many of the grains are ones you probably have in your house any way, and if they're not, give them a shot. It's fun to find new ways to use cornmeal, quinoa, millet, oats, wheat bran, etc in every day meals.

I made a few adjustments to the recipe, based on need and preference. I love, love, love the way it turned out.

Multigrain Bread Extraordinaire, from the Bread Baker's Apprentice

Ingredients:
Soaker
3 T cornmeal (polenta), millet, quinoa or amaranth (I used cornmeal and quinoa)
3 T rolled oats or wheat, buckwheat or triticale flakes (I used the rolled oats)
2 T wheat bran (I used wheat germ and bulgar wheat)
(also consider: Steel cut oats, wheat germ, bulgar wheat and others)
1/4 cup water

Dough
3 cups bread flour
2 T brown sugar (I used 1 T white sugar and 1 T molasses)
1 1/2 t salt
1 T instant yeast
3 T cooked brown rice (I used black rice that they happened to have at the restaurant)
1 1/2 T honey
1/2 cup buttermilk or milk (I used half and half)
3/4 cup water


On the day before, make the soaker. Combining the grains with the water activates the enzymes which will improve the bread flavor and behavior. Cover the bowl and leave it at room temperature overnight.

To make the dough, stir the flour, brown sugar, salt and yeast in the bowl of an electric mixer, or in a large mixing bowl. Add the soaker, rice, honey, buttermilk and water. Stir (or mix with the paddle attachment) until the ingredients form a ball. Knead on a floured surface for 12 minutes, or mix with the dough hook for 8-10 minutes on med-low speed). The dough should be soft and homogenous, but not sticky. When you pull a bit of the dough out into a square between your fingers, it should form a thin, translucent "windowpane" instead of tearing. Thats when you'll know that the gluten has sufficiently developed. Transfer the dough to an oiled bowl and cover with plastic wrap. Let rise at room temperature for about an hour and a half, until the dough has doubled in size.

When the dough has risen, its time to shape it. You can either form a loaf and bake in a loaf pan, or you can form a round "boule" like I have in the above picture. In either case it's important to have enough surface tension that the bread can rise in a nice shape, so pull around the edges of the dough and tuck them into the middle of the loaf. Place your loaves in or on the thing they will be baked in or on, and let them proof, or rise again, for another 90 minutes.

Towards the end of this rise, preheat your oven to 350 degrees. Then when it's time, bake the loaves for 20 minutes (small loaves should be done), then rotate (for larger loaves) and bake for 15 minutes more. If the inside is tested with a thermometer, it should register 185-190 degrees.

When the loaves are down baking, remove them from their pans and let cool for an hour or two before slicing in. The cooling completes the baking process.

Take note of the delicious specks of grains! This bread tastes fab with butter and jam, and could be a great sandwich bread.


Oh, last friday was rough. I baked almost 200 lbs of flour in one looong night. All for the farmer's market. Pictured are 2 of the 3 racks I filled.

Boy howdy I love it though.

Wednesday, April 21, 2010

Raspberry White Chocolate Buttermilk Cake


I had to think of a quick cake to make for the restaurant last week, and this is what I came up with. It's very good, but next time I will use fresh or frozen raspberries instead of the jam.

The cake is a variation of the Blueberry Buttermilk cake I made previously, found originally on Smitten Kitchen.

I doubled the original recipe, swirled in Raspberry Jam, and added white chocolate.

Raspberry White Chocolate Buttermilk Cake

2 cup AP Flour
1 t baking powder
1 t baking soda
1/2 t salt
1 stick butter, softened
1 1/3 cup sugar, plus 1 1/2 t sugar, divided
1 t vanilla
2 eggs
1 cup well shaken buttermilk
1 cup fresh raspberries, or 1/4-1/2 cup raspberry jam
1/2-1 cup white chocolate chips

Preheat the oven to 400 degrees with the rack in the middle. Line the bottom of a 9 or 10-in round cake pan with parchment paper.

Whisk together the flour, baking powder and soda, and salt. Cream the butter and the 1 1/3 cup sugar in your mixer until pale and fluffy. Beat in the vanilla and the eggs.

Gradually add the flour mixture and buttermilk, alternating and beginning and ending with the flour.

Set aside aside 1/2 cup of the batter and mix it with the raspberry jam. Mix the remaining batter with 1/2-1 cup white chocolate chips. Pour the white chocolate batter into the cake pan, then swirl in the raspberry mixture.

Bake for about 40 minutes, and check first by pressing the middle of the cake with your finger. If it bounces back, check with a knife. (if you check too soon with a knife, the cake could fall). If the knife comes our clean, you're done!

Let the cake cool and remove from the pan. Sprinkle with powdered sugar if desired, and serve. Enjoy!

Monday, April 12, 2010

Lemon Tart


I love lemon curd. I like it swirled into cheesecake, I like it sandwiched between cake layers, I like to eat it with a spoon, still warm in the bowl.

This lemon curd might actually be better called a lemon cream. It is light and so smooth and just plain ethereal. If something can be "plain" ethereal.

It's been so hot here, and I've been dealing with melted chocolate all over my kitchen and my clothes, so the accompaniment to the Peanut Butter Torte was this light, refreshing lemon tart. Which is deceiving because there's over 2.5 sticks of butter in it, so it's not really that light.

The secret is not melting the butter with the curd, but adding it at the end and blending it in with a blender, making it incredibly creamy and fluffy.

"The Most Extraordinary French Lemon Cream Tart" by Dorie Greenspan

1 cup sugar
Grated zest of 3 lemons
4 large eggs
3/4 cup fresh lemon juice (from 4-5 lemons)
2 sticks plus 5 T unsalted butter, cut into tablespoon-size pieces, at room temperature
1 9-in tart shell (recipe follows)


Grab a heat proof bowl and bring a few inches of water to a simmer in a saucepan. Put the sugar and the zest in the bowl, and rub them together until this sugar is moist and fragrant. Whisk in the eggs, then the lemon juice.

Set this bowl over the simmering water and start stirring once it's warm. The recipe says cook the curd until it reaches 180 degrees, but for me it never really got there. I'd say just cook until the whisk leaves tracks. I would say you could even skip the bowl part and cook it in the saucepan over really low heat until bubbles start forming. Don't heat too quickly, though, or your eggs will curdle, and stir, stir all the time.

Once the egg mixture has thickened and reached the appropriate temperature, remove the curd from heat and strain it into a blender or food processor. The straining is a pain but completely necessary as it removes the zest and any eggy bits that may have formed. Let the curd stand 5-10 minutes, stirring occasionally.

Turn on the blender and add the butter a little bit at a time. Make sure the curd keeps moving and scrape down the sides as you go. Once the butter is all incorporated, keep the blender going for about 3 more minutes to get it all nice and creamy/fluffy.

Pour the cream into a bowl, press a piece of plastic wrap to the surface and refrigerate for 4 hours or overnight. (3 hours was completely adequate for me.)

When you're ready to assemble the tart, stir up the cream to loosen it and spoon it into your waiting tart shell. It's best eaten the day you assemble it, but you can keep the curd by itself in the fridge for 4 days or freeze it for up to two months.

And the sweet dough tart shell....

1 1/2 cup flour
1/2 cup confectioner's sugar
1/4 t salt
1 stick plus 1 T very cold butter, cut into small pieces
1 large egg yolk

Get out your handy food processor, and dump in the flour, confectioner's sugar and salt. Pulse a couple of times to combine, and then scatter the butter over the surface. Pulse until the butter is the size of peas, then add the egg yolk and pulse until it's all combined and clumpy. Don't over blend or your tart crust won't be flaky. Pull all the bits together into a ball and press it into a 9 in tart pan. (But don't press too hard or you'll have cement crust)

Freeze the crust for 30 minutes before baking*. Meanwhile, preheat to 375 degrees.

Now, take a piece of aluminum foil and rub butter on the shiny side. Press this buttered side onto the dough in the tart pan and bake the crust for 25 minutes. At this point, take out the crust, remove the foil, and press down the bottom with the back of a spoon if it's puffed up. Bake for another 8 min until the crust is golden. If the edges are getting too dark, you can cover them with aluminum foil.

Let the crust cool before filling.

* Extra steps like freezing always annoy me, but in this case, the freezing means you don't have to weigh down the bottom of your crust with pie weights or beans. I would much rather freeze than mess around with a bunch of dry beans.


Friends: this is one of my new favorite desserts. The crust is crunchy and fab and the cream is so silky and so good after a winter of chocolate. Welcome to spring.

Not that I'm over chocolate, by any means.

Peanut Butter Torte (it's divine)


Last weekend Eric and I went to our new friend Elisa's apartment for a potluck-ish get-together. She made delicious shrimp-studded pasta for a main course.

There was never any question that I would be bringing a dessert as my contribution. It's odd, my identity here in Augusta is all wrapped up in my being a "baker." It's never been that before, I've always been "The Artist" or "The Local" or the "The Girl with Dreadlocks." (Yes, new-friends-who-know-me-as-baker, I had dreadlocks in college for awhile.) I'm sure the friend who've known me forever aren't surprised I've found a way to incorporate even more desserts into my life, but I'm not sure they trust my expertise as people here do :)

Anyway, as all I have been making is cakes recently, I thought I'd try a dessert of a different color for the potluck. I just got several new cookbooks in the mail, all of which I'm very excited about:

Peter Reinhart's Whole Grain Breads
Jim Lahey's My Bread (this is the no-knead guy)
Dorie Greenspan's From My Home to Yours

And the last is where I got the recipe for this fantastic PB Torte, and the lemon tart I'll feature next. Lemme tell you, people went ape for it.

(Dorie's book is full of fantatic recipes, and she has a great blog, too)

The recipe says it serves 6-8, but I think really....more like 12. I'm not saying I wouldn't scarf down the 6 person size portion...but i probably shouldn't.

1 1/4 cups finely chopped salted peanuts (I only had honey roasted, so I used those and added a bit of salt to the filling)
2 t sugar
1/2 t instant espresso powder (I skipped this, it still tasted good)
1/4 t ground cinnamon
pinch grated nutmeg
1/2 cup mini chocolate chips
24 oreo cookies, finely crumbled (food. processor.)
1/2 stick butter, melted and cooled
small pinch of salt
2 1/2 cups heavy cream, divided
1 1/4 cups confectioner's sugar, sifted
12 oz cream cheese
1 1/2 cups salted peanut butter, crunchy or smooth but not natural
2 T whole milk
4 oz bittersweet chocolate, finely chopped

Preheat the oven to 350 (this is just to bake the crust)

Mix the oreo crumbs, butter and salt together in a small bowl. Press it into the sides and bottom of a greased spring form pan. Freeze the crust for 10 minutes, then bake for 10 minutes. Let cool.

Toss 1/2 cup of the chopped peanuts, the sugar, espresso, cinnamon, nutmeg and chocolate chips in a small bowl and set aside. (This will be mixed into the filling later)

Whip 2 cups of heavy cream with a stand (with whisk attachment) or hand mixer until it holds medium peaks. Add only 1/4 cup powdered sugar and beat until it holds medium-firm peaks. Set the cream aside (in a new container, you'll need the mixer again)

With the paddle attachment, beat the cream cheese and remaining 1 cup powdered sugar until very smooth. Add the peanut butter, 1/4 cup chopped peanuts and the milk.

Use a spatula to gently stir in 1/4 of the whipped cream. Stir in the peanut/spice/chocolate mixture, then gently incorporate the rest of the whipped cream.

Scrape the mousse filling into the crust and smooth the top. Refrigerate at least 4 hours. I froze mine for a couple hour and it worked okay, but a longer refrigeration would be much better. My torte was kind of soft at the potluck.

Once the torte is set, heat the remaining 1/2 cup cream and pour over the bittersweet chocolate to create a chocolate ganache. Let sit for a minute and stir until very smooth. Pour it over the torte, and sprinkle the remaining 1/2 cup peanuts over the top.


Put it in the fridge for a couple more minutes to harden the ganache and remove the springform pan by either scraping a knife around the edges or circling a hot wet towel around the outside.

Serve and sigh with pleasure.

More bread talk


This was the first sourdough I made with my barm. I'm hoping as it ages it gets more leavening oomph, because without any yeast, this loaf is what I got. It had great sourdough flavor, but barely rose at all. I could see the folds inside from where I shaped it.

So when I make sourdough at the restaurant, I use a bit of yeast, because I don't want to be stuck with 20 pounds of lazy dough on my hands (or the sad dough lumps which would serve as the embarrassing evidence on the rack after baking.) However, the yeast makes the flavor less potent. The first batch I made only had a sourdough after taste. The second I used 1/3 wheat flour and it had a more sour flavor. It was pretty good, actually.

Peter Reinhart's Sourdough goes something like this...

A starter made with 2/3 cup barm, 1 cup bread flour and 1/8-1/4 cup water. You let it stand until doubled in size, about 4 hours, and then stick it in the fridge over night.

The next day, cut up the starter and let it warm for an hour at room temperature. Mix it with 4.5 cups bread flour, 2 t salt, and 1.5-.75 lukewarm water. And if you're me lately, 1.5 t instant yeast. Knead for 10-15 minutes, or use the dough hook in your mixer for 4 minutes, let rest for 5, then mix for 4.

If you add the yeast, you only have to cover the dough in an oiled bowl and let it rise for and hour and a half, and then shape it into boules and proof (rise again) for an hour or so.

If there is no yeast, Peter recommends letting the dough rise for 3-4 hours, shaping, then proofing for 2-3 hours. And if you're me, your dough probably won't rise that much any way. Now that my barm is 3 or so weeks old, I may try the no yeast method again.

Also, sorry to discourage you home bread bakers, but the bread baking in the commercial oven at the restaurant always turns out better than my home bread. The oven at the restaurant gets hotter and has a steaming mechanism that works way better than spritzing the walls of you oven with water.

Steaming, by the way, helps with the development of the crust. It prevents it from getting too hard too fast (which would inhibit the initial rising of the bread).

I'm continuing to feed my starter, and I'm hoping to become more familiar with this mysteriously simple/complicated bread.

I think the crust on these fail loaves was very beautiful, kind of like a painting.


Tuesday, April 6, 2010

Macaron Experiment


I never understood this new obsession with macarons. I hadn't tasted one, but I had the impression that they were hard, dry little cookies, kind of like a cross between Necco Wafer and Shortbread. Not appetizing all all, hardly gush-worthy.

Why did I assume they were nasty? Was it judging by looks only or my tendency to mistrust foreign cookies?

When I was in New York City in March, I met a girl who was freakily similar to me (she's Mako's assistant, loves Twilight and baking, among other things. She's even taking culinary courses right now!) Anyway, we spent hours swapping city bakeries we loved, and she told me of a place nearby that had cupcakes and macarons. It wasn't long until I was standing in the shop, ordering a salted caramel macaron at her urging.

And it was awesome! Macaron cookies are crunchy on the outside and chewy on the inside, with a burst flavor in between. Turns out, macarons are completely delicious.

Now, faced with their reputation as fussy, hard to make desserts, and a delicious taste in my memory, multiplied by an excess of egg white after making creme brulees at work...I knew a macaron attempt was in my immediate future.


Macaron ingredients are usually just these: almonds, confectioner's sugar and egg whites. Super simple.

You can use almond flour, or (as I did) grind whole almonds and confectioner's sugar in a food processor as finely as you can. The confectioner's sugar helps the almond resist turning into almond butter and stay floury. Pictured below.

I used recipes from David Lebowitz and Tartlette. Regular flavored and Chocolate.

The consistency is supposed to be like "Magma," whatever that means. Neither recipes turned out exactly how I pictured, with rounded tops and cute little feet...my pink ones (colored with food coloring) mostly cracked, and the brown ones had little pointy hats.

I used a 1/2-in pastry tip to pipe the macaron rounds. Everything I read said the little circles should smooth, but not spread.

Pictured above is my first tray.

...and after they baked.

They still tasted good though, crackly and chewy.

Above are the chocolate ones...their little points never smoothed out as they should, though they did bake nicely and develop petite feet.

So I guess I conclude that the first batch wasn't stiff enough, and the second was too stiff. I'm going to try again, but by the end of that day I was completely sugared out and my teeth felt mossy. I don't think I will try it again too soon.

I filled the workable chocolate cookies with cardamom buttercream. I just mixed butter and powdered sugar and a bit of cardamom. It had great flavor.

I'm going to wait to have an absolute macaron success before I post any recipes, but the site of the two I tried have great ideas and hints. Good luck!