

Tuesday, November 23, 2010
tell me you can relate to this.
Saturday, November 20, 2010
Sweet and Salty Brownies by Baked
GUARANTEED TO BE YOUR MOST INCREDIBLE BROWNIE EXPERIENCE, OR YOUR MONEY BACK AND YOUR WASTED TIME REFUNDED.
 Or at least that's what I wrote on the sign at the restaurant. There were no dissatisfied customers. Here is why:
1. Outrageously fudgey brownies
2. Thin crust on top of brownie
3. Salted caramel center
4. Sea salt and turbinado sugar topping
 One of my favorite bakeries (and baking book) has added a new addition- Baked Explorations: Classic American Desserts Reinvented. In it, they release the recipe for their famed Sweet and Salty Brownies, as well as many other delicious takes on dessert, like a Mississippi Mud Pie, Grasshopper Bars and Buckeyes.
 One of my favorite bakeries (and baking book) has added a new addition- Baked Explorations: Classic American Desserts Reinvented. In it, they release the recipe for their famed Sweet and Salty Brownies, as well as many other delicious takes on dessert, like a Mississippi Mud Pie, Grasshopper Bars and Buckeyes.
The point is, if you want to be very popular with your friends or impress friends you hope to have or simply boost your reputation as a comfort food genius or convince your children/husband that boxed brownies are not all there are in the world, I suggest you make these relatively easy brownies.


Sweet and Salty Brownies, adapted from Baked
Make the caramel first.
1 cup sugar
1/4 c water
1/2 cup heavy cream
1/4 cup sour cream
1 t fleur de sel (sea salt) or other coarse grained salt
In a saucepan, combine the sugar and water, stirring over high heat until the sugar is dissolved. The let it cook without stirring, swirling the pan occasionally, until the caramel is deep amber in color. Be ready at this point to whisk in the cream- the caramel gets dark very quickly at the end and continues cooking even after you turn off the heat. Whisk in the cream, being careful of the steam and bubbling that will occur. Then whisk in the salt and the sour cream. Set aside.
And then the Brownies
1 1/4 cup flour
1 t salt
2 T cocoa powder
11 oz dark chocolate, chopped (or chips)
2 sticks butter, cubed
1 1/2 cup sugar
1/2 cup firmly packed brown sugar
5 large eggs
1 t vanilla
Preheat the oven to 350 degrees and prepare a 9 x 13 baking dish by lining it with parchment paper and buttering it or spraying it with cooking spray. You can skip the parchment if need be.
In a metal bowl set over a pan of an inch or two of simmering water, combine the cubed butter and the chocolate. Stir occasionally until the two are melted together.
While the butter and chocolate are melting, whisk the flour, salt and cocoa powder together.
When the butter and chocolate are melted and combined, remove from the heat and stir in the two sugars until the mixture is homogenous. Whisk in 3 of the eggs until just combined. Add the vanilla. Whisk in the remaining eggs until just combined. Finally, sift the flour mixture into the chocolate mixture and fold the two together until just combined. If you mix it too much at this stage, your brownies will be cakey.
Pour half the brownie batter into the pan. Drizzle one cup of the caramel over the batter, avoiding the edges (any caramel touching the edge of the pan or exposed to the air during baking will get very hard.) Pour the rest of the batter over the caramel, spreading and smoothing it to cover it completely.
Bake for about 30 minutes, rotating the pan once. You can stab the middle with a knife to make sure it's done, but be aware that if you stab where there is caramel, it may look undone even if its not.
Sprinkle the top of the brownies with fleur de sel and turbinado sugar (or other coarse salt and sugar). Let cool, slice and start looooving life!

Monday, November 15, 2010
Lemon-Ginger Creme Brulee

I make Creme Brulee at least twice a week at the restaurant. Until recently I stuck to chocolate and vanilla, but I've branched out and results have been fantastic.


The cool thing about creme brulee is that you can flavor it with pretty much anything you can steep in cream. You can use anything from ground spices and liquors to herbs and fruits. Try thyme, citrus zest, mint, lavender, cardamom, mocha, etc!

I've also recently found out that there is a cart in San Francisco that sells really creative flavors of creme brulee on the street. Next time I'm in San Francisco (which will be the first time I'm in San Francisco), I definitely plan on braving the streets and the lines to try this creamiest of desserts.
The flavor is courtesy of David Lebovitz, in Ready for Dessert, who tells us that ginger contains an enzyme that will prevent the custard from setting unless you parboil it first. Good to know, David! I would've wasted a lot of cream and eggs with out that valuable information.
The base recipe is divine, it's from the Le Cordon Bleu Professional Baking book, and you need look no further for your use-for-everything creme brulee recipe. It's very similar to Lebovitz's.
Lemon Ginger Creme Brulee Recipe (makes 6 servings, half of the recipe I make at the restaurant)
3 cups heavy cream
6 egg yolks
3 oz sugar (a tad less than a half cup)
pinch salt
3 oz thinly sliced ginger plus the grated zest of two lemons*
extra sugar for caramelizing the tops of the brulees
Slice ginger thinly and place in a medium saucepan. Add enough water to cover the ginger and bring to a boil. Reduce heat and simmer for 2 minutes, then pour off the water.
Add the cream and the lemon zest to the ginger. Heat until warm again and then let steep for an hour to meld the flavors.
Towards the end of the hour, preheat the oven to 350 degrees and gather your ramekins. You will need approximately 6. Prepare a water bath for them to bake in- a 9 x 13 baking dish works well. Place the ramekins in the pan and pour very hot water around them, half way up their sides.
Strain the cream to remove the ginger and much of the zest. Add the salt. Reheat the cream until quite warm. In a medium bowl, whisk the yolks with the sugar (you can also add the salt at this stage instead of adding it to the cream), until the yolks are pale and fluffy.
Gradually add in the hot cream, whisking constantly. If you move too fast through this stage you will have little bits of cooked egg in your creme brulee, and nobody wants that. Slowly add the cream until it is all well combined. Try not to make too many bubbles on the surface of the custard mixture as you do this.
Pour the custard mixture through a strainer (to remove rouge egg bits) into a spouted container and divide the custard mixture evenly between the ramekins.
You can cover the whole thing with aluminum foil if you're worried about the tops of the brulees browning, but I've found if you cook them in the low-middle of the oven, you don't need to worry about foil. Bake for 30 plus minutes until the edges of the brulees are set and the centers are still a little loose. In the whackadoo oven at the restaurant, this takes over an hour, but in normal ovens it should be closer to 30 minutes.
Cool the custards completely before refrigerating (in the water bath if you're worried about them setting, out of the bath if you're confident they're good to go). They won't completely set until they've been chilled in the fridge.
* for vanilla creme brulee, omit the lemon zest and ginger, adding half of a scraped vanilla bean plus the pod to the cream (You will strain the pod out later) Heat the cream and let steep for only a few minutes (opposed to an hour) before adding it to the yolks. A slick trick to avoid clumps of vanilla seeds in the milk is to rub them into some of the sugar that you are using, then put both rubbed sugar and seeds in the cream. If you have no vanilla bean, use about 1 teaspoon good quality vanilla extract...but the resulting brulees won't have exciting flecks of vanilla bean in it.
 For serving, grab your kitchen, brulee or small propane torch. Guess what we use at the restaurant? Thats right, the propane torch.
 Sprinkle the top of the brulee with sugar and knock off the excess. Blast with the torch until melted but not brown. Sprinkle on another layer of sugar and blast this layer until the sugar is brown and caramelized. Do this step carefully, you don't want black tops to your carefully baked dessert. Nobody wants that.


Let's be real, not all of us have access to a torch. There are other options, but you must choose one because custard with no caramel on top can never be called creme brulee (which I suspect means something to do with "burnt" in french, the sugar being burnt in this case.) (Yep, I was right, it means burnt. Thanks Google.)
You can either sprinkle with sugar and use your oven broiler to try to caramelize the tops, or you can make caramel (with only sugar and water or even just sugar) and pour a thin layer on top of the brulee, swirling it to make it even. Be careful not to burn yourself. Nobody wants that.
Wednesday, November 10, 2010
Caramel Cake with Apple Filling
Apples often seem pretty plain jane to me. It was a fruit we always had in the house growing up,* and so I never thought it very special. This could be because I kind of hate red delicious apples, and pretty much any other apple that is sold at the grocery store in a plastic bag with ten other of its fellows. Not very special at all.
 However, I declare Fall 2010 the Apple Revolution! Let us rejoice with the bounty of autumnal boughs hanging heavy with the crisp, sweet-tart fruit that is the apple!
 And caramel. Everything I make has caramel in it these days.
Apple Revolution started a couple weekends ago when Eric and I went to Greensboro, NC for a wedding (shout out to Haley and Dave! Hooray!). We found there, surprisingly near our hotel and the highway, the absolute biggest farmer's market I have ever seen. It had three massive awnings that housed vendors selling everything from pumpkins to bread to flowers to apples. So many apples. I bought a very large bag filled with one of every kind I could find. We're talking Winesap and Arkansas Black and King Luscious and Duchess and Honeycrisp (aren't apple names just wonderful!)


Therefore...you will be seeing a lot of apple related desserts around here in the coming weeks.
The inspiration for this cake came from Honey and Jam, but I couldn't make the frosting from that recipe set. It stayed a caramel goo mess. Fortunately, I found a delicious recipe on Epicurious from Bon Appetit. If you beat the frosting a little, you get this dark, thick frosting that reminds me of caramels. If you beat it a lot, the frosting becomes lighter in color and very fluffy. Both are tasty, but I like the way the darker one looks better.
This combination is awesome, by the way. Truly awesome. The cake is a rare vanilla cake that stays moist for many days in a world full of dry cakes. The individual components take some time (mostly cooling time, so don't try to make this on a tight schedule), but you can spread out the making of the cake and it's not bad.
Vanilla Cake from Cakelove (it's best if you can weigh the ingredients, and so much easier)
I make this times 1.5 to come up with a three layer cake.
Preheat the oven to 350 and prepare two 9-in cake pans with parchment rounds in the bottom and butter or spray.
Dry Ingredients:
AP Flour, 7 oz or 1 1/4 cup plus 2 tbs
potato starch, 2 oz (you can sub cornstarch if necessary)
baking powder, 1 1/2 tsp
salt, 1 tsp
Wet Ingredients:
half and half, 1 cup
brandy, 2 tbs (can sub more half and half for this)
vanilla extract, 1 tbs
Creaming:
unsalted butter, room temp, 6 oz or 1 1/2 sticks
extra-fine granulated sugar, 14 oz or 1 3/4 cups (you can food process regular sugar to make extra fine.)
eggs, 4 large
Start by mixing the butter and sugar with in an electric mixer with the paddle attachment. Mix on med-low for at least 5 minutes, the more time the better. It will be very fluffy.
Meanwhile, whisk the dry ingredients in a bowl and sift together. In a separate container, combine all the wet ingredients.
After the butter and sugar are sufficiently creamed, add the eggs one at a time, blending well between each.
Finally, add the wet and dry ingredients in 5 alternating additions, waiting only until the ingredients are just incorporated before adding the next addition. Scrape the bowl and mix on medium speed for 15-20 seconds.
Divide the batter between the pans and bake for 25-28 minutes, until a cake tester inserted in the middle comes out clean. Cool completely before frosting.
Apple Filling adapted from Honey and Jam
I doubled this for a triple layer cake.
2 large granny smith (or other baking-type) apples
1/2 t ground cinnamon
1/2 cup sugar
2 tsp lemon juice
Peel the apples and grate with a box grater. Combine all the ingredients in a saucepan and cook until the apples are tender and there is little liquid left. Cool completely.
Caramel Frosting from Epicurious
1 cup sugar
1/4 cup water
1/2 cup cream
2 egg yolks
1 stick unsalted butter, room temp
1/8 t salt
1 cup powdered sugar
Stir the sugar and water together and cook over med-high heat, swirling the pot occasionally (not stirring). Cook until the caramel is deep amber; watch it carefully, it will continue to darken a little after you turn off the heat. Remove from the burner and whisk in the cream (watch out for steam and bubbles). Stir until the caramel is smooth.
Whisk the egg yolks in a bowl, and gradually whisk in the hot caramel. Cool the caramel mixture.
In the bowl of an electric mixer, beat the butter and powdered sugar together until smooth. Beat in the caramel mixture. Let stand at room temperature until thick enough to spread, about an hour.
Spread the apple filling between the cake layers and frost the outside of the cake with caramel frosting. If you have time to freeze your cake layers, it makes frosting easier.
Go, enjoy this quintessential fall cake.
* Oddly enough, we also always had bananas around too when I was growing up, but that apparently had the opposite effect on me than the ever-present-bagged apple, because now I am slightly obsessed with the banana. Really, its the perfect fruit.
Sunday, October 31, 2010
October was great.
Remember the Chocolate Bread?

It made fantastic french toast. I made mine a sandwich with bananas (the perfect fruit!) and peanut butter and whipped cream.

And now, I will tell you that October was great because:
1. It finally feels like fall here in Augusta, GA.
2. It was my birthday. (Yes, the whole month- October is my birthday. Except for October 10, because that is my mom's birthday.) Poor Eric- I was raised to believe that birthdays are really, really important, so he is having to take a crash course in the whole birthday song and dance.

He did great. There was a very surprising party with pumpkin carving and fruity pebble treats and a pinata!
3. Sara and Andrew's wedding.

4. Eric and I dressed as mimes and went to a Halloween 80s dance party. We've decided to get really good at miming for next year.


5. The Farmer's Market (which I've been baking for and selling at almost every weekend since April) finished with a bang this month. Yesterday, in fact. I love baking a ton of bread and spending time at the market.

And I'm looking forward to November because:
1. Camping at Tybee Island with friends!
2. We're playing in a soccer tournament in Hilton Head, the place of our engagement.
3. Harry Potter 7 part 1 November 19! My generation grew up with HP, and I am proud to love it.
4. Thanksgiving with my family on the farm in Virginia!
5. No more farmer's market every weekend!
Fantastic Ciabatta Bread
 You don't know this, but I have been trying in vain for the past few months to make a ciabatta bread that looks attractive, has a crunchy crust, and a soft interior with the large holes that make ciabatta, ciabatta. I've tried Peter Reinhart's recipe so many times. I've tried random recipes off the internet, I've tried the no-knead bread recipe, and I've tried the "Artisan Bread in 5 min a Day" recipe, all to no avail. They produce pretty tasty bread, but none with the holes I was looking for. Very frustrating, let me tell you.
 WELL, I HAVE ARRIVED. I could tell just from the dough that this recipe was the one. It was wet, but still had structure. Even when I turned it out onto the table to divide it, it didn't deflate. The dough was strong, but still developed the gas holes. Killer. Thrilling. I'm beside myself with joy. Thank you King Arthur Flour. Thank you, thank you, thank you.
In a selfish way, I'm almost reticent to share this with you, considering what I went through to get here...bu I've decided to save you pain. And King Arthur has tons of baller recipes.
I made only a few changes to this recipe, noted in the ingredients.
First, you must stir up a pre-ferment that will sit overnight, developing flavor. Mix these ingredients together and let sit for 10-15 hours until very, very bubbly.
1 1/2 cups (6 1/4 oz) bread flour or King Arthur AP flour
1 cup (8 oz) cool water
1/16 t instant yeast
When ready to mix the dough, combine the pre-ferment and the rest of the ingredients in the bowl of a mixer.
all of the starter (pre-ferment)
1 t instant yeast
1 1/2 cup (6 1/4 oz) bread flour or King Arthur AP flour
1 1/4 tsp salt
1 tsp sugar
1 tbs nonfat dry milk*
1/4 cup (2 oz) water*
2 tbs (7/8 oz) olive oil
(*instead of the dry milk and water, I just used 1/4 cup milk)
It's important you use a mixer because the dough is so soft (basically impossible to knead by hand).

These pictures show the recipe multiplied by 8
Beat at medium speed using the paddle attachment. I had to switch to the dough hook after a few minutes because the dough climbed up onto the paddle and clung there like a frightened monkey. When sufficiently mixed, the dough will be gorgeously smooth and elastic. It took more like 10 minutes in my big mixer.

Look at that gluten development! See how stretchy and shiny it is!!

Place the dough in a greased bowl and set aside to rise. After one hour, stretch each side and fold over the middle, then turn the whole thing upside-down so the seams are on the bottom.

folded dough
Let rise one more hour (two hours total rising time, with the folding in the middle)

fully risen dough
Gently turn the dough out onto a floured surface (no need to go nuts with the flour. This dough isn't as sticky and gloppy as some of the no-knead recipes).

Use a knife to divide the dough into 2 loaves, or smaller bits for sandwiches. (K.A. website says for the two loaves, you should have two fat logs, about 10"x4").
Gently transfer the dough to a baking sheet, stretching them out slightly, leaving about 4" between them.
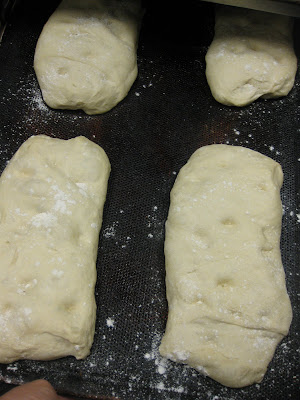
Allow to rise for 60-90 minutes, dimpling with your fingers halfway through. You can push your fingers almost to the bottom of the loaves, the holes will fill partially back up. Preheat the oven to 425 degrees about 20 minutes before baking time.
Spritz the loaves with luke warm water (to help create steam) and bake until golden brown, about 18-20 minutes. You can also create steam by placing a rimmed baking sheet in the oven during preheat and pouring hot water onto it just before loading the loaves in the oven. Steam is necessary to facilitate proper "oven spring" (the sudden burst of yeast activity and loaf expansion when hit with the heat of the oven) and the development of a proper crust.
 Great Scott this is good bread! Eric and I cut it in half lengthwise, toast it and eat bruschetta on it practically every Sunday. We're about to eat some now, in fact. Just combine diced tomatoes, minced garlic, lemon juice, olive oil and fresh chopped basil, then spread it on the toasted ciabatta bread. Add some mozzarella if you like. The crust gets crunchy and the interior stays soft. YUM.
Saturday, October 16, 2010
Flan de Naranja

I love chocolate as much as the next girl, but I promise you that I will choose desserts from the custard/pudding family first every time. The texture! I love the smooth creaminess that holds its shape but yields the second it's placed on your tongue...
The only problem is desserts of this nature are usually comprised almost entirely of cream, egg yolks and sugar. Aka, not health food as we usually define it.
Which is why, dear readers, I was positively THRILLED to find this recipe for "Orange Flan." Which is as close to health food that custard will ever venture. Which is why I bought a large bag of oranges the very next day.

In general flan, unlike creme brulee or other egg custards, is not worth eating without the caramel topping, and this orange flan is no exception. Make the caramel. It will hit your tongue first, giving way to a mysterious orange egginess. If you think this is a puzzling set of flavors, you are correct- but you'll be completely satisfied mulling them over as you take the next bite...and the next...
 The custard is incredibly easy to prepare, so save your worry for the caramel, which can be tricky.
Flan de Naranja (Orange Flan), adapted from Apple Pie, Patis and Pate
Preheat the oven to 325 degrees, and get out 4 ramekins and a baking dish that will hold all of them.
Have 4 6-oz ramekins at the ready. Combine 1/2 cup sugar with 2 tablespoons of water in a sauce pot. Heat over medium-high heat, stirring only until the sugar is dissolved. Once the syrup boils, watch it carefully and swirl the pan occasionally to make sure the mixture is heating evenly. Cook until the caramel is deep amber- but be careful! It cooks some after you take it off the heat, so you may want to take it almost there and have some cool water in the sink to stick the bottom of the pot in to make sure you don't burn it. Burnt caramel is inedible.
Working quickly before the caramel hardens, pour a little into each ramekin, coating the bottom. I swirled mine to get the caramel on the sides too, but it's not necessary, and hot caramel is VERY HOT. And STICKY. And DANGEROUS. (or, because we're dealing with a Spanish dessert here- PELIGROSO!)
Make the custard:
6 large eggs
5 T sugar
1 1/3 cups fresh squeezed orange juice (about 4-5 large oranges)
1 t orange zest (from one orange)
In a large bowl, lightly beat the eggs with a fork. Try not to incorporate too much air into the eggs. Mix in the sugar, and then slowly mix in the orange juice while beating the eggs. Strain to remove pulp or seeds. Add the zest and stir.
Get out the baking dish and line with a tea towel. Place ramekins in the dish and distribute the custard mixture evenly among them. Pour hot water in the pan so it comes half way up the sides of the ramekins. This will help the flans bake evenly.
Bake in the preheated oven for 45-55 minutes until the centers are set. Once done, remove the ramekins from the water bath and let cool at room temperature. Chill in the fridge for at least an hour. Run a knife around the edges of the flans and invert onto plates to serve.

I figured it out- each flan only has about 1.5 eggs and less than 2 tablespoons of sugar. Not too shabby.
Subscribe to:
Comments (Atom)