Showing posts with label mint. Show all posts

Tuesday, June 22, 2010

Mint Oreo Ice Cream


I'm back! I'm so sorry I left you for so long. It's been the most hectic month. I saw some of you this past weekend and the general consensus is that you're sick of seeing the planter every time you check out the Fox Fix.

If I may offer some excuses- we packed up our house and shoved everything in our new one and spent a long weekend at Spencer and Liz's wedding and I had the worst case of poison ivy EVER. (I have no idea where I could've gotten the poison ivy, which is pretty scary. I feel like it could get me again at any time. My left eye and forehead swelled up so bad I looked like one of the aliens in the movie Avatar. Thus, in addition to everything else, I was also on steroids this month. Lemme tell you, I was a real joy to be around.)

We're now living surrounded by boxes. Our new place is about half the size of the old one, especially if you consider that we had a basement before where shoved everything we didn't want around. So slowly, slowly we're moving things around and unpacking. It's like trying to solve a rubiks cube, this place is so packed with stuff.

I'll share one before picture with you, just so you're duly impressed when the after pictures come in who knows how many weeks or months. Our mattress is on our couches in the middle room and is an oasis where we hang out, sleep and have meals.


What's that you say? This is a food blog? Oh, right. I'm supposed to share a recipe with you.

I actually have about 15 different posts that have been building up over this month, because I haven't stopped making things (only stopped showing up here), so I'm going to make an effort to post every day this week to try to catch up. So stay tuned!


If I may be so bold...this recipe may actually be worth the wait. It's Mint Oreo Ice Cream, based on a recipe from David Lebovitz's The Perfect Scoop. Made with fresh mint, it is perfectly creamy and utter bliss. It's pretty much convinced me that I will always make custard style ice cream. It's definitely worth the extra effort.

And speaking of worth-it things, if you have any interest at all in making ice cream, you need to buy The Perfect Scoop. It's chock-full of fantastic tips and explanations and recipes, from ice creams to sorbet to gelato to sauces and beyond. Lebovitz's blog is excellent and full of recipes, too.

Ingredients:
1 cup whole milk
3/4 cup sugar
2 cups heavy cream
pinch of salt
2 cups lightly packed fresh mint leaves
5 large egg yolks

Warm the milk, sugar, 1 cup of cream and salt in a small saucepan. Stir in the mint leaves, cover the pot, and remove it from heat. Let it sit at room temperature for an hour to infuse the mint flavor into the milk mixture.


Strain the milk into a medium saucepan; discard the leaves. Depending on your mint, your milk might be a lovely shade of green. Mine was just barely tinted. Take a sip- mint milk! Pour the other cup of cream into a large bowl and set the strainer on top. If you want to speed the cooling process that will need to happen later, you can put this bowl of cream into a larger bowl of ice.

Re-warm the mint-milk. In a medium bowl, whisk together the egg yolk. Slowly pour the mint milk into the yolks, whisking all the time. This stabilizes them so they don't curdle immediately when heated in the pot. Pour the yolk-mint-milk back into the pot.

Stir the mixture constantly over medium heat, scraping the bottom as you stir, until the mixture is thick enough to coat the back of a spoon. Here is where I screwed up- I forgot I wasn't making pastry cream or something, and I boiled the milk. And it it curdled. So don't boil the milk- it needs to reach a temperature of about 175, but much higher and the eggs will curdle.

However, if you like me scramble your eggs, don't lose hope. Do what I did and put the warm liquid in a blender and run til smooth. Then you're back on track.


Pour the custard through the strainer into the cream bowl and stir until cool over the ice bath.

Then chill until absolutely cool in the refrigerator. If you try to churn too-warm custard, the final product's texture will be off. So be patient! And when it's cool, just freeze according to your ice cream maker's instructions. OR this icecream does perfectly well if you just put it in your freezer and stir it every half hour or so, more often at the end. So if you're planning to be at home for the night, this is a perfectly viable option.

I added chopped oreos to my mint ice cream, which was very tasty. You could also try chocolate or brownie bits. However, the mint flavor is so fresh and creamy and unlike store bought (nasty green overpowering mint extract) icecream, that you could definitely enjoy it with no add-ins.

I'm very impatient for an excuse to make this bliss again. Come visit and we'll make ice cream!

Sunday, May 30, 2010

My Planter Project


First, dear readers, I have to share some news. We are moving from our little oasis, our nest of marital bliss. This is not so exciting, but we found a new place and I'm sure we'll have fun there too.

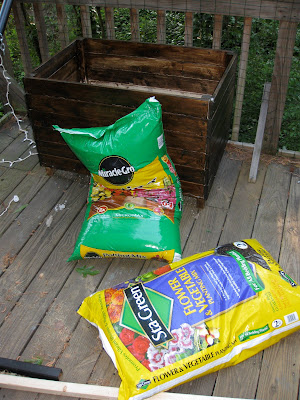
Secondly, right before I found out we had to move, I got this burning desire to plant something. To plant a lot of things. I never wanted to have to buy tomatoes or herbs again. Undaunted by our profound lack of yard, I set to work building a planter. Slightly ill-conceived, but functional for now. Lunch today was balsamic reduction, mozzarella, tomatoes and basil-from-the-planter, so today it's a success.

I broke out our circular saw for the first time to cut down lots of 8'x2"x1" boards. I read all the cautions very carefully, because I knew Eric would be upset to see me fingerless.

I made up the shape on the spot, and if I was going to do it again, I would make it shallower and wider. My plants are pretty smashed in together. And, filled with dirt, it weighs about 200 pounds. I'm still hoping, hoping we can move it though.

I cut a sheet of....whatever that holey board is called....to fit the bottom to allow excess water to drain. I worked furiously all day because I knew that the project would go over waaaay better with Eric if I was done with it when he saw it for the first time, than if the thing was still in pieces all over the porch.

I filled the bottom with gravel to help with drainage too. (Eric came home and said "You bought rocks and dirt???" But he thought it was great over all.)

It actually took 3 50-pound-bags of dirt to fill the thing.

I planted rosemary, basil, parsely, two types of mint, cilantro, oregano, tomatoes, and then our neighbor gave me some tiny little pepper plants. Yes, all that in that little space. Next time I'd do it differently. It's 3"x2"x2"

Oh, see how my darling plants have grown!! It's thrilling to see how much they grow every week. They are all doing fantastic except for the oregano, which now that I think of it may have been thyme. Anyway, its dead.

I hope I can move it in a month with out emptying it.

Saturday, March 13, 2010

Grasshopper Cake


My Baked Cookbook hit another one out of the park. The inspiration for this cake is the mint-chocolate grasshopper pie, made with marshmallows and creme de menthe (ew?) which is inspired by the mint-chocolate grasshopper drink, bright green, with the main ingredient again being, creme de menthe.

I thought this cake sounded like a better use of the liquor, and the flavor did not disappoint. I enjoyed making the frosting- it's like making a pudding and whipping butter in. The chocolate ganache helps balance out all the mint, and made a lovely garnish.

First, make your favorite chocolate recipe, or used the Baked recipe I posted for the Sweet and Salty Cake.

For the Creme De Menthe Buttercream
2 1/4 cups sugar
1/2 cup AP Flour
2 1/4 cups milk
1/2 cups heavy cream
4 1/2 sticks unsalted butter, soft but cool, cut into pieces
2 T creme de menthe (OR 1 T vanilla and some green food coloring)
2 1/4 t peppermint extract
Baked suggests using chocolate wafer cookies for garnish, too.

In a medium heavy bottomed saucepan, whisk the sugar and flour together. Add the milk and cream and cook over medium heat, whisking occasionally. (Be careful the milk mixture doesn't burn on the bottom). Cook until the mixture has come to a boil and thickened, 10-20 minutes.

Transfer to the bowl of an electric mixer fitted with the paddle attachment. Beat on high speed until cool. Reduce speed to low and add the butter, one T at a time; mix thoroughly until incorporated. Increase the speed to medium high and beat until the mixture is light and fluffy.

Add the creme de menthe and peppermint extract and mix until combined.

Chocolate Ganache
6 oz dark chocolate
1/2 cup heavy cream
1 T creme de menthe
1/2 t peppermint extract (I omitted the flavorings)

Bring the creme to a boil in a saucepan, then pour over the chocolate in a heat proof bowl. Let the cream sit for 2 minutes, then stir until smooth. Add the flavorings.

Put chocolate ganache on each cake layer, and top with frosting. Assemble the layers. I added more creme to the ganache to make a thinner chocolate to pour over the top and then threw on some chocolate chips.

So, so tasty.

Thursday, November 19, 2009

Mojito Cake by Cakelove


As we know, Mojitos are one of the best uses for rum. And there are a lot of fantastic uses for rum, as my roommates and I explored our senior year of college.
Examples:
Hot Rum Spiced Cider
Rum-nana Pancakes
Rice Pudding flavoring
Actually, flavoring just about any dessert. Also any drink or icecream.

We thought that buying the massive jug of rum would be more cost effective and last us a long time. It did not, because it's very presence inspired us to add it to almost everything we ate or drank.

Anyway...why not a mojito cake? Thanks, Cakelove!


Preheat to 350. Prepare two 9 in cake pans.

Ingredients:
12 oz AP flour (or 2 cups plus 2 T)
1/4 cup potato starch
1 t salt
1/4 vanilla powder (I omitted this.)
1/4 t baking soda
3 whole cloves, ground (I used pre-ground)
1/3 cup oven dried mint (place mint leaves in an aluminum foil pouch. poke holes with a fork. bake at 350 for 10-15 minutes. Crush with fingers and remove stems. )

Whisk together and set aside

2/3 cup sour cream
1/4 cup half and half
3 T dark rum
2 t vanilla extract
1 t molasses
1 t lemoncello (I was unable to find this at our liquor store, so I used
1 lime, zested (to add to the butter and sugar) and segmented (meaning cutting the juice pods away from the white segments holding them to the middle. So you have just juice pods and no strings or tough parts) (add the juice pods to the rest of these ingredients)

Whisk together and set aside

8 oz (2 sticks) unsalted butter, softened
18 oz (2 1/4 cups) extra fine sugar
2 t minced lime zest
4 large eggs
2 large egg yolks

Cream the butter, sugar and lime zest in a mixer at low speed until light and fluffy, about 5 min.
Add the eggs and yolks one at a time, fully blending each.
Add the dry and wet ingredients, alternating in 3 to 5 additions, in about a minute (don't linger over this step.) Scrape the mixer, and then beat on medium for 15-20 sec.

Pour into cake pans and bake about 30 min, until a knife or skewer stuck in the middle comes out clean.


I saved some batter and made myself a couple cupcakes:


While your cakes are cooling (don't remove from the pans until they are cool, then wrap in plastic wrap and refrigerate), make your Rum Italian Meringue Buttercream (recipe in previous post).


Doctor up your layers, pile them on, do the crumb coat, chill, and then glop on the frosting. You may want to garnish with mint leaves and Raw Sugar.

Be sure to serve at Room temp. This cake is a little denser, and is in fact called a pound cake in the book. So for the cake an icing to be soft, pull out of the fridge about an hour before serving.

Saturday, October 17, 2009

Mint Cheesecake with Chocolate Ganache


I've wanted to make this cheesecake for awhile now. Cheesecakes are nice, uncomplicated things to make. Really all your real worries are how done is done? and why did my cheesecake crack?

I got the Cook's Illustrated "All-Time Best Recipes" magazine, and for each entry they explore what potentially goes wrong with a recipe, and then how they made it ULTIMATE pie crust, french chicken in a pot, New York Style Cheesecake or what have you.

In this recipe, they explored crust options, sour cream vs heavy cream, number of eggs and baking times and temps and this is what they came up with for the perfect cheesecake...

...which, by the way, takes 2.5 pounds of cream cheese that looks like this on a plate:


Graham Cracker Crust:

1 cup (4 oz) graham cracker crumbs (8 whole crackers, broken into rough pieces and processed in a food processor til fine)*
1 T sugar
5 T unsalted butter, melted, plus more for greasing the pan.

*the recipe also says you can subsitute chocolate wafers for graham crackers. I used chocolate teddi grahams in a mad teddi graham massacre.

Cheesecake filling:

2.5 pounds cream cheese (which is 5 of the 8 oz packages you'll most likely buy at the store), cut into rough 1 in pieces and left at room temp for 30-45 min
1/8 t salt
1.5 cups sugar
1/3 cup sour cream
2 t juice from 1 lemon
2 t vanilla extract
1 large egg yolks plus 6 large whole eggs

* I also added about 2 t peppermint extract and some green food coloring


Directions:

1. For the Crust:
Oven rack to lower-middle position and 325 degrees. Combine cracker crumbs and sugar, slowly at 5 T melted butter and combine til evenly moistened. Brush bottom and sides of a 9 in springform pan with most of the remaining butter. Empty crumbs into pan and press evenly into the bottom. Bake until fragrant and beginning to brown around edges, about 13 minutes. Let cool and go on to make the filling.

2. For the Filling:
Increase oven temp to 500. With a mixer, beat cream cheese at med-low speed to break up and soften; about 1 min. Scrape beater and bottom, add salt and sugar slowly, scraping and beating until combined. Add sour cream, lemon juice and vanilla and beat at low speed until combined. Scrape bowl, add yolks, combine and scrape. Add the 6 eggs, 2 at a time, scraping and beating in between additions.
3. Set springform pan on baking sheet to catch potential spills. Pour filling into the cooled crust and bake 10 min, without opening door. Reduce oven temp to 200 and bake until an instant read thermometer inserted into middle of cheesecake registers about 150 degrees, about 1.5 hours. Transfer cheesecake to wire rack and cool about 5 min, then run knife arounf edges to release from the pan. (This prevents post-cooking crackage.) Cool until barely warm, 2.5-3 hours. Refridgerate until cold, at least 3 hrs. (will keep up to 4 days.)

Recommended to stand at room temp 30 min before serving.


The recipe made a ton, so I poured excess into little ramekins that Audrey decorated for us for a wedding present (Thanks Audrey!).

When the cheesecakes had cooled for a little while, I made the chocolate ganache to pour on top.

Chocolate Ganache:

8 oz semisweet chocolate (chopped, chunks or chips)
3/4 cup heavy cream
2 T butter
sugar to taste (optional)

Place chocolate in a heat-proof bowl. Heat the cream until bubbling around the edges, and pour over chocolate. Let stand for 1 minute, chunk in the butter and sugar if using, and stir until combined and smooth.

Pour over cheesecake and spread or shake to make smooth. Chill.


I may have gone a tad overboard with the green food coloring, or maybe it intensifies with time, because the cheesecake at the restaurant is awfully green. Hopefully it's not off-putting.

Enjoy!