Tuesday, October 5, 2010

Pumpkin Spice Cake with Maple Cream Cheese Frosting


Hooray for pumpkin dessert season! I'm so pleased to be able to pop pumpkin muffins in my mouth every day now, telling myself they're healthy despite the chocolate chips I add liberally.

And it's great to have fall options for non-chocolate cakes at the restaurant. I'm sure sick of lemon-berry combinations. It's on to pumpkin and apples and cobblers and caramel apples and spicy things!

Also I need to figure out what tree is blooming in my yard that smells like apricots.


On a side note, this past weekend was Sara and Andrew's wedding. It was one of the very best weddings I've ever been to- so creative and delicious and visually stunning. Her mother and relatives picked and arranged the flowers themselves. They were lovely, jewel toned and wild-looking bouquets. Sara wanted a dessert spread on tree stump cake stands, so we baked non-stop from thursday to saturday and made 10 different cakes, pies and cheesecakes. Best of all, Sara and Andrew are so utterly perfect for each other, I want to hold them at arms' length and just grin at them, ending with a nice cheek pinch.

Um so anyway, this cake is very moist and spicy and divinely delicious. Make it this weekend for your favorite person.
Many, many bloggers have posted this cake, but the original is from David Leite and can be found here.

For the pumpkin cake (I made the original recipe times 1.5 to come up with a three layer cake. Here, it is already multiplied for the three layer.)

1 1/2 sticks unsalted butter, softened
1 1/2 cups dark brown sugar, packed
1/2 cup granulated sugar
3 cups cake flour
3 tsp baking powder
1 1/2 tsp baking soda
1 1/2 tsp ground cinnamon
1 1/2 tsp ground ginger
3/4 tsp ground nutmeg
1/4 tsp ground cloves
3/4 tsp salt
1/4 tsp fresh ground black pepper
3 large eggs
3/4 cup buttermilk
1 1/2 tsp vanilla
1 7/8 cup canned solid-pack pumpkin.

Preheat the oven to 350 degrees. Spray with oil and line 3 8 or 9-in round cake pans with parchment paper.

Cream the butter and the sugars in a stand mixer on low speed for about 5 minutes, until fluffy. While this is going on, sift the flour, baking powder and soda, salt and spices together in a medium bowl.

Add the eggs one at a time to the butter mixture, scraping down the sides of the bowl after each addition. Mix the butter milk and the vanilla, and alternate adding the buttermilk and the flour mixture to the butter/eggs in 5 additions, beginning and ending with the dry ingredients. Add the pumpkin and mix until smooth, scraping down the bowl as needed.

Divide the batter between the pans and smooth the top of the batter. Drop the pans onto the counter from a height of a few inches to jar out any air bubbles lurking below the surface. Bake the cakes for about a half an hour, until a knife or toothpick inserted into the center comes out clean. Cool the pans for 15 minutes and then turn the cakes out onto racks and cool completely.

Make the frosting (adapted slightly):

16 oz (two packages) cream cheese
2 sticks butter, room temperature
1 pound confectioner's sugar
1/3 cup pure maple syrup, or to taste

Beat all the ingredients with a mixer until smooth and fluffy. (add the confectioner's sugar slowly while beating).

This cake might need to be refrigerated after frosting for about 30 minutes to set before cutting. I sprinkled cinnamon on mine. Mmmmmm.

Monday, October 4, 2010

Ah, Sourdough.


this was a good loaf.

Sunday, October 3, 2010

Pane al Cioccolato


Chocolate Bread! What bliss is this?

As I drove these loaves, fresh from the oven, to the farmer's market last Saturday, my entire car filled with the most delicious melted chocolate smell. I lovingly assigned these loaves to the front of our booth; a prominent position next to the cinnamon rolls. It was very hard to stop myself from caressing the dark brown crust dusted with streaks of flour in front of the customers.

I cut a loaf open under the pretense of offering a taste to customers (but really, I couldn't help myself any longer.) And chocolate bread is exactly what this is. I know, I know, I'm being obvious here- but it wasn't so chocolately that it seemed like dessert, and it was definitely bread texture- but all chocolate taste.

Let's talk about the possibilities for chocolate bread, people:
1. Toasted for breakfast with coffee or chai. (oh, go ahead, spread on some butter.)
2. Peanut butter sandwich! (banana optional)
3. Spread with Nutella and sprinkle with berries.
4. If (unlikely) some of this bread should be left after a few days, make chocolate bread pudding!

The recipe is from an amazing blog I found called Apple Pie, Patis and Pate. The author of the blog creates amazing international dishes, and (most impressive to me) bread with beautiful irregular holes and lovely slashes.

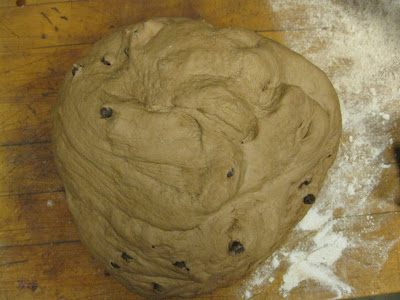
kneaded final dough

Chocolate Bread, from Apple Pie, Patis and Pate.

Make the wild yeast starter first:
1 oz sourdough starter (50% hydration)*
1/4 cup (1.125 oz) bread flour
.625 oz water

Stir thoroughly and let ferment at room temperature for 8 hrs.

*If you need to make a sourdough started, here is a link to Peter Reinhart's instructions.)

Make the Final Dough:
All of the wild yeast starter, cut into pieces
3 cups (13.875 oz) bread flour
1 1/8 cup (8.75 oz) water
4 Tbs (2.5 oz) honey
1 Tbs vanilla
4 Tbs (.875 oz) cocoa powder
1/4 tsp instant yeast
1 Tbs (.375 oz) kosher salt
2.75 oz chocolate chips (don't add these until the end of the kneading, after the gluten is developed. Add too early, and the gluten will be inhibited and the chocolate chips will melt into the dough)

Mix everything (but the chocolate chips) together, and knead for 8-10 minutes. Rest for 5 minutes. Add the chocolate chips and knead until evenly distributed. If using a mixer, knead by hand for a minute at the end.

shaped chocolate loaves; i quadrupled this recipe

Place the finished dough in a large oiled bowl. Cover with plastic wrap and let rise for two hours at room temperature.

At the end of this time, divide the dough into two pieces, about a pound each. Shape each into a loose ball and let rest for 20-30 minutes.

Next, shape into the final loaf- either a boule or batard. (here is a nice video on batard shaping) Finally, proof at room temperature for 3 hours on the pan you plan to bake on.

partial truckload of bread for the market

About 30 minutes before the end of proofing, preheat the oven to 400 degrees. When ready to bake, take a sharp knife or a razor blade or lame, and make two or three slashes down the length of the bread. Load the bread into the oven and create steam by pouring a cup of hot water into a separate pan, or by spraying the walls of the oven with water. Bake for 35-40 minutes, rotating the loaves once. Let cool for an hour before slicing.

Chocolate Bread Madness!

Tuesday, September 28, 2010

Toasted Coconut Cake


I have never made a coconut cake before last week, and since then I have made three. I've never made one before this because, while I love the flavor and smell of coconut, the texture of shredded coconut makes my skin crawl and my teeth itch.

this cake was made with the Bon Appetit recipe x 1.5

My new friend Laura likes coconut cake, though, and it was her birthday so I gave it a shot. I used this recipe from Bon Appetit magazine, and it was very good. I loved using cream of coconut in the cake- it kept it very moist for days while the leftovers sat on the table slowly being nibbled away. It featured cream cheese frosting flavored with a bit of cream of coconut. (not to be confused with coconut milk).

I used farm fresh eggs from Eric's friend at work for Laura's cake.

But then, inspired by the whole coconut bit and an article in my new Food and Wine magazine, I tried out another coconut cake for the restaurant. This cake was more angelfood-like, but was brushed with rum syrup (slurp!), and had light and airy italian meringue buttercream frosting.

I'll leave to you coconut fanatics to decide which cake is better, because both got rave reviews. It probably depends if you go for light and airy or dense and moist.

Towering Coconut Layer Cake adapted from Tyler Florence for Food and Wine magazine

Layers:
10 eggs
1 1/2 cups sugar
1 tbs vanilla extract
1/2 cup plus 1 T vegetable oil
1 1/2 cup AP flour
1/4 cup cornstarch
1 t kosher salt or 1/2 t regular salt

Preheat the oven to 350 degrees. Butter or spray 4 9-in cake pans and line with parchment rounds.

Using an electric mixer, mix the butter, sugar and eggs on high until the mixture is fluffy and tripled in volume. Gradually beat in the oil until fully incorporated.

In another bowl, sift the flour, salt and cornstarch. Fold these dry ingredients into the egg mixture until smooth.

Spread the batter evenly between the 4 cake pans, smoothing the top, and bake for about 20 minutes, or until a toothpick inserted into the middle of the cake comes out clean. Let cool on racks.

Make the Rum Syrup:

1/4 cup sugar
1/4 cup water
2 tbs spiced rum (i used white rum, it still tasted good)

Stir the sugar and water together in a small saucepan over high heat until the sugar is fully dissolved. Let cool then stir in the rum.

Make the Coconut frosting:

1 1/2 sugar
1/2 cup water
6 large egg whites
4 sticks (1 pound) butter, room temperature
1 1/2 tbs coconut extract
2 cups coconut flakes (I used sweetened), toasted.

In a saucepan, stir the water and sugar together over high heat until the sugar is dissolved. Then stop stirring and let boil until the syrup reaches 228 degrees on a candy thermometer. If you don't have such a thermometer, just boil until you can see the faintest tinges of gold starting in the syrup. This as always worked for me.

A few minutes into the boiling, start whipping the egg whites in a perfectly clean stand mixer bowl with the whisk attachment. Beat until stiff peaks form. When the syrup is ready, while running the mixer on medium high, gradually beat in the hot syrup. When it's all in, reduce the speed of the mixer to medium and beat until the egg whites have cooled to room temperature.

At this point, beat in the butter, a couple tablespoons at a time until it's all encorporated. If the mixture looks like its curdling, power through, it should come together in the end with enough beating. Mix in the coconut extract.

To assemble to cake:

Brush each layer with the Rum Syrup, spread each with about 1 1/4 cup frosting and stack. Frost the outside of the cake and then press the toasted coconut to the sides of the cake. If desired, you can also sprinkle toasted coconut between the layers, too. If you like coconut, that is.
If you don't like coconut flakes, you can just eat the interior like I did.

Wednesday, September 22, 2010

Buttermilk Ice Cream


It is my fantasy to someday soon make ice cream with fresh, local eggs with fresh, local, non homogenized cream. Eric has been getting fresh eggs from a man at his work, so that part's covered. Sometimes we get cartons full of little bitty eggs, half the size of normal ones, and it's so fun to eat tiny fried eggs with tiny toasts. I'll keep you updated on my mission for fresh cream.

This ice cream is another recipe that I made while spending the week with Eric's Family at the Lake in New York. It went great with all our desserts for the end of the week- like Micah's mixed berry pie and my mother in law's fantastic thin-but-tender-heart-shaped-waffles and currant sorbet/syrup

It has a custard base, so it stays smooth and creamy in the freezer. It tastes sort of like frozen yogurt, but with the buttery richness of buttermilk giving it that je ne sais se quoi- that indescribable quality that makes something irresistible.

Don't be fooled by the looks- this is not vanilla ice cream by anyone's standards.

Buttermilk Ice Cream, from The Last Course via Smitten Kitchen

2 cups heavy cream
1 1/4 cups sugar
8-12 egg yolks (I used 10)
2 cups buttermilk
2 t vanilla
pinch of salt

Heat the cream and one cup of sugar to simmering in a large pot on the stove. Meanwhile, whisk the egg yolks with the remaining 1/4 cup sugar.

Temper the egg yolks by whisking little amounts of hot cream into the yolks at a time, and so gradually raising the temperature of the yolks so they don't curdle. Once most of the cream has been added slowly and the eggs mixture is hot, you can whisk the rest in all at once.

Cook the egg yolk mixture over the stove until it can coat the back of a spoon (and thus becomes custard). Don't, DON'T, DON'T boil, or the eggs will curdle. However, if they should curdle, carefully blend the custard in a blender until smooth again.

Strain the custard into the buttermilk and stir in the salt and the vanilla.

Cool the mixture for several hours until completely cool, then freeze according to your ice cream maker's instructions.

It will be very soft at first (which isn't bad at all, just melty), but a few hours in the freezer makes it just the right consistency.

One of the best meals of my life- those waffles with currants and gooseberries and buttermilk ice cream and currant sorbet. Oh, and fresh whipped cream. Enjoyed on a cliff by a impossibly blue lake.

Tuesday, September 21, 2010

Apple Butter

Even though it is still 96 degrees here, it is officially fall and I am going to behave as such.

My mother and father planted an orchard when we first moved to the farm in Virginia when I was in middle school. They planted it up on the great tall hill behind our house. It was a beautiful location, but the deer ravished the young trees every year, stripping them of leaves and tender branches. Finally, it was necessary to up root the entire orchard and plant it closer to the house (and our dogs) to prevent the deer from eating it all up! This set the trees back a few years on their path to maturity.

So it is now, about 11 years later, that the trees are bearing fruit. Two weekends ago, I picked buckets full of apples with my mother- finally enjoying the (literal) fruits of her labor. I made it home with two large bags full of Rome, Fuji and Golden Delicious apples. It is strange and quite nice to use fruit that is smaller and more blemished than you ever see in Kroger.

Apple Butter runs through my family's veins; every fall the relatives on my mother's side all join together and take turns stirring a massive pot over a bonfire in the Missouri countryside and come away with gallons and gallons of the smoothest, spiciest apple butter.

I wasn't quit up to an epic outdoor fire apple butter session with my two grocery bags of apples, but my friends Sara and Andrew (who are getting married in less than three weeks!!) told me about a fantastic Apple Butter recipe that they found on Simply Recipes, so I gave it a shot. Andrew added a secret ingredient that maybe I'll be able to share here eventually...

Yesterday I saw a pumpkin stand in town, and this morning I had apple butter on toast. Maybe fall will come to Augusta after all.

Apple Butter, adapted from Simply Recipes

4 pounds of apples, chunked, damaged parts removed (but not cored or peeled, because those parts add pectin and flavor.)
1 cup apple cider vinegar
water
2.5-4 cups sugar (1/2 cup for every cup of puree the apples produce)
salt
2 t cinnamon
1/2 t cloves
1/2 t allspice
zest and juice from 1 lemon

large pot for boiling apples and then jars
large deep pan for boiling down apple puree
canning jars and lids
blender (optional)
sieve
tongs
canning funnel (optional)
clean towels
cup measure

Put the apples in the large pot, add the apple cider vinegar and enough water to cover them. Cover the pot and bring to a boil. Boil until the apples are soft, about 20 minutes.

Mashed the apples and press through the sieve, or puree in a blender or food processor and then sieve. Measure the cups of puree into the large deep pan and add 1/2 cup sugar for every cup of puree. Add a dash of salt, the spices and the lemon juice. Adjust spices to taste.

(Other spice idea: I have recently read about cardamom apple butter, which I am definitely going to try next time I make it, because cardamom is pretty much the best spice ever.)

Cook uncovered on low heat for 1-3 hours until desired consistency is reached. Stir very often. I probably cooked mine down more than I had to (after only an hour); mine is very thick and I only got 2 and a half half-pint jars. You might even get double that if you stop sooner. The more you stir, the faster the apple butter will thicken because it will help the moisture evaporate.

Make sure to prepare your canning set up well before the apple butter is done cooking down.

I would read though proper canning techniques as improperly canned foods can make you sick or dead.

this is a good link:

Because Apple Butter and jams have such a high sugar I use a method that involves sterilizing my jars in boiling water that completely covers them for at least ten minutes and quickly pouring hot jam into hot jars and quickly lidding them with hot lids (making sure to wipe the top of the jar with a clean towel before lidding it.) As the jars cool, they will seal themselves.

I would research canning thoroughly before deciding what method to use, but I've never had any problems canning jam in this way.

Somehow, apple butter tastes both deep and spicy, but also super fresh. Kind of like apple cider. I think this is best way to use apples, maybe even better than pies and tarts (but you be the judge, I'm posting an apple pie recipe soon.)


Tuesday, September 14, 2010

My excuse for a post today.


Is the world's longest watermelon sitting on my kitchen counter?


A google search for "longest watermelon" proved fruitless (ha. ha.), but here is the world's LARGEST watermelon:

http://www.hopemelonfest.com/largestmelon1.htm

Hope, Arkansas: Home of the Bill Clinton, Mike Huckabee and the world's largest watermelons.

grown right here in North Augusta, SC