Showing posts with label bread. Show all posts

Wednesday, March 2, 2011

Caramelized Bread Pudding with Cinnamon and Chocolate


Oh my gosh! So many people are getting married this summer! I'm estimating that we will attend at least 6 weddings this spring/summer...it's starting to remind me of the summer after college when all my friends tied the knot. I spent all my savings on gifts and bridesmaid dresses that summer.

Don't get me wrong, weddings are a blast and I'm so excited for all of our almost-married friends, but your boss starts looking at you funny when you tell him you'll need another weekend off for - "Let me guess, Mikaela. A wedding." Yup.

And that's not even the craziness thing that's happening...even crazier is that the first round of friends to get married? The ones from the summer after college? They're starting to have BABIES. Mind-blowing. BABIES. Inconceivable.

We want kids, lots of them even, but as we always say...just not right now. Sorry mom.

That said, I'll tell you what we do want right now, what marrieds and singles and parents and children all want right this very minute, even if they don't know it: We all want BREAD PUDDING.

Specifically we all want this bread pudding, and that is because it has a very high custard-to-bread ratio. Nothing is more disappointing than dry, clunky bread pudding, but I'll give you the secrets to bread pudding nirvana:

1. Chocolate layer on the bottom.
2. Only one layer of bread, smothered with butter.
3. A veritable waterfall of custard.
4. Hints of cinnamon and nutmeg.
5. And...wait for it...a caramelized top. That's right. You brulee the top before serving. Could this get any better? No! I attest it could not.

This layered bread pudding is a FANTASTIC respite from the dense bread puddings that seem to have been made from pureed bread.

The recipe is adapted from Suzanne Goin's Sunday Suppers at Lucques, phenomenal cookbook filled with recipes for entire meals organized by season. Every recipe is pure gold.

There's also a helpful video of Suzanna Goin making this bread pudding at Martha Stewart's website.

Caramelized Bread Pudding with Chocolate and Cinnamon

2 T unsalted butter, softened
5 slices brioche or white bread, crusts removed
3 egg yolks
3 eggs
1/4 cup brown sugar
1 1/2 cup heavy cream
1 1/4 cup whole milk
1/2 tsp cinnamon
1/4 tsp nutmeg
1/4 t salt
1 cup dark chocolate, chopped or chips
plus about a tablespoon of sugar for the caramelizing

Preheat the oven to 350 degrees. Sprinkle the bottom of a 9x9 baking dish with the chocolate.

Butter one side of each slice of the bread, cut it into quarters, and layer on top of the chocolate. The edges of the pieces should overlap a bit, but there should be only one layer of bread.

Whisk the eggs and egg yolks with the brown sugar, then whisk in the cream, whole milk, cinnamon, nutmeg and salt. Pour the custard over the bread slices, and use your fingers to push down on the bread slightly to make sure it's not dry anywhere.

Place the bread pudding baking dish into a roasting pan and into the oven. Fill the roasting pan with boiling water so the water comes half way up the side of the bread pudding dish. This will help it cook evenly and keep the custard smooth.

Bake for 1 hour 15 minutes until the bread is slightly puffed up and the custard is set. Let cool for 10 minutes, then sprinkle the top of the bread pudding with sugar and caramelize with a torch or under the boiler. If using the boiler, watch it carefully so it doesn't burn and the custard doesn't curdle.

Scoop out of the pan with a large spoon to serve, making sure you get all of the yummy chocolate on the bottom.

Mmmm, enjoy. Seriously, this is so good I want some right now...I know what I'll be making at the restaurant tomorrow!

Friday, January 21, 2011

"The Best Bread Ever" or "The Tartine Rustic Country Loaf"


This was the most exciting week of my bread-baking life. I feel like I've been let into a secret world where fresh, rustic, crusty bread exists just for the taking.

This is all thanks to the book Tartine Bread, written by Chad Robertson. He who owns Tartine bakery in San Francisco with his pastry chef wife. Awesome.

I am so enchanted by his bread baking journey. He apprenticed with artisan bakers in both the US and France, stoking wood-fired ovens and tweaking and developing his bread until he came up with what some people say is the best bread in the United States. Apparently Tartine Bakery sells out of bread within an hour of baking every single day. I would really love to apprentice to a small-operation baker with a wood oven sometime in the next year or two.

Like many sourdough breads, the bread is 100% naturally leavened (no commercial yeast), but unlike sourdough, Tartine Bread is made with a "young" started, one that hasn't developed a very sour flavor. This bread has the rustic appearance, crispy crust, and a lovely spongy inside full of big holes that I've been searching for ever since I started making bread over a year ago. This isn't gimmicky make-it-in-five-minutes bread, it's the real deal. From start to finish, it takes around 20 hours to make, not to mention feeding your starter every day. I've kept my starter since last April, but I was keeping it in the refrigerator and only feeding it once a week. Keeping it on the counter and feeding it every day has made all the difference in the flavor and leavening power.


Sunday, October 31, 2010

Fantastic Ciabatta Bread


You don't know this, but I have been trying in vain for the past few months to make a ciabatta bread that looks attractive, has a crunchy crust, and a soft interior with the large holes that make ciabatta, ciabatta. I've tried Peter Reinhart's recipe so many times. I've tried random recipes off the internet, I've tried the no-knead bread recipe, and I've tried the "Artisan Bread in 5 min a Day" recipe, all to no avail. They produce pretty tasty bread, but none with the holes I was looking for. Very frustrating, let me tell you.

WELL, I HAVE ARRIVED. I could tell just from the dough that this recipe was the one. It was wet, but still had structure. Even when I turned it out onto the table to divide it, it didn't deflate. The dough was strong, but still developed the gas holes. Killer. Thrilling. I'm beside myself with joy. Thank you King Arthur Flour. Thank you, thank you, thank you.

In a selfish way, I'm almost reticent to share this with you, considering what I went through to get here...bu I've decided to save you pain. And King Arthur has tons of baller recipes.
I made only a few changes to this recipe, noted in the ingredients.


First, you must stir up a pre-ferment that will sit overnight, developing flavor. Mix these ingredients together and let sit for 10-15 hours until very, very bubbly.

1 1/2 cups (6 1/4 oz) bread flour or King Arthur AP flour
1 cup (8 oz) cool water
1/16 t instant yeast

When ready to mix the dough, combine the pre-ferment and the rest of the ingredients in the bowl of a mixer.

all of the starter (pre-ferment)
1 t instant yeast
1 1/2 cup (6 1/4 oz) bread flour or King Arthur AP flour
1 1/4 tsp salt
1 tsp sugar
1 tbs nonfat dry milk*
1/4 cup (2 oz) water*
2 tbs (7/8 oz) olive oil

(*instead of the dry milk and water, I just used 1/4 cup milk)

It's important you use a mixer because the dough is so soft (basically impossible to knead by hand).

These pictures show the recipe multiplied by 8

Beat at medium speed using the paddle attachment. I had to switch to the dough hook after a few minutes because the dough climbed up onto the paddle and clung there like a frightened monkey. When sufficiently mixed, the dough will be gorgeously smooth and elastic. It took more like 10 minutes in my big mixer.

Look at that gluten development! See how stretchy and shiny it is!!

Place the dough in a greased bowl and set aside to rise. After one hour, stretch each side and fold over the middle, then turn the whole thing upside-down so the seams are on the bottom.

folded dough

Let rise one more hour (two hours total rising time, with the folding in the middle)

fully risen dough

Gently turn the dough out onto a floured surface (no need to go nuts with the flour. This dough isn't as sticky and gloppy as some of the no-knead recipes).

Use a knife to divide the dough into 2 loaves, or smaller bits for sandwiches. (K.A. website says for the two loaves, you should have two fat logs, about 10"x4").

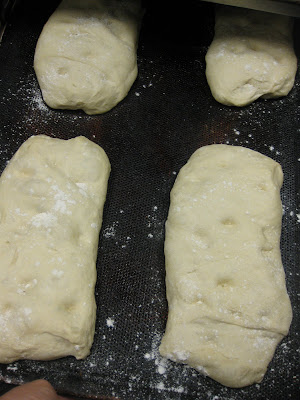
Gently transfer the dough to a baking sheet, stretching them out slightly, leaving about 4" between them.

Allow to rise for 60-90 minutes, dimpling with your fingers halfway through. You can push your fingers almost to the bottom of the loaves, the holes will fill partially back up. Preheat the oven to 425 degrees about 20 minutes before baking time.

Spritz the loaves with luke warm water (to help create steam) and bake until golden brown, about 18-20 minutes. You can also create steam by placing a rimmed baking sheet in the oven during preheat and pouring hot water onto it just before loading the loaves in the oven. Steam is necessary to facilitate proper "oven spring" (the sudden burst of yeast activity and loaf expansion when hit with the heat of the oven) and the development of a proper crust.

Great Scott this is good bread! Eric and I cut it in half lengthwise, toast it and eat bruschetta on it practically every Sunday. We're about to eat some now, in fact. Just combine diced tomatoes, minced garlic, lemon juice, olive oil and fresh chopped basil, then spread it on the toasted ciabatta bread. Add some mozzarella if you like. The crust gets crunchy and the interior stays soft. YUM.

Sunday, October 3, 2010

Pane al Cioccolato


Chocolate Bread! What bliss is this?

As I drove these loaves, fresh from the oven, to the farmer's market last Saturday, my entire car filled with the most delicious melted chocolate smell. I lovingly assigned these loaves to the front of our booth; a prominent position next to the cinnamon rolls. It was very hard to stop myself from caressing the dark brown crust dusted with streaks of flour in front of the customers.

I cut a loaf open under the pretense of offering a taste to customers (but really, I couldn't help myself any longer.) And chocolate bread is exactly what this is. I know, I know, I'm being obvious here- but it wasn't so chocolately that it seemed like dessert, and it was definitely bread texture- but all chocolate taste.

Let's talk about the possibilities for chocolate bread, people:
1. Toasted for breakfast with coffee or chai. (oh, go ahead, spread on some butter.)
2. Peanut butter sandwich! (banana optional)
3. Spread with Nutella and sprinkle with berries.
4. If (unlikely) some of this bread should be left after a few days, make chocolate bread pudding!

The recipe is from an amazing blog I found called Apple Pie, Patis and Pate. The author of the blog creates amazing international dishes, and (most impressive to me) bread with beautiful irregular holes and lovely slashes.

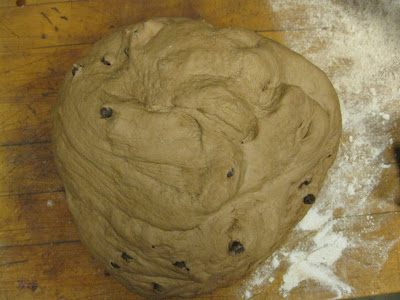
kneaded final dough

Chocolate Bread, from Apple Pie, Patis and Pate.

Make the wild yeast starter first:
1 oz sourdough starter (50% hydration)*
1/4 cup (1.125 oz) bread flour
.625 oz water

Stir thoroughly and let ferment at room temperature for 8 hrs.

*If you need to make a sourdough started, here is a link to Peter Reinhart's instructions.)

Make the Final Dough:
All of the wild yeast starter, cut into pieces
3 cups (13.875 oz) bread flour
1 1/8 cup (8.75 oz) water
4 Tbs (2.5 oz) honey
1 Tbs vanilla
4 Tbs (.875 oz) cocoa powder
1/4 tsp instant yeast
1 Tbs (.375 oz) kosher salt
2.75 oz chocolate chips (don't add these until the end of the kneading, after the gluten is developed. Add too early, and the gluten will be inhibited and the chocolate chips will melt into the dough)

Mix everything (but the chocolate chips) together, and knead for 8-10 minutes. Rest for 5 minutes. Add the chocolate chips and knead until evenly distributed. If using a mixer, knead by hand for a minute at the end.

shaped chocolate loaves; i quadrupled this recipe

Place the finished dough in a large oiled bowl. Cover with plastic wrap and let rise for two hours at room temperature.

At the end of this time, divide the dough into two pieces, about a pound each. Shape each into a loose ball and let rest for 20-30 minutes.

Next, shape into the final loaf- either a boule or batard. (here is a nice video on batard shaping) Finally, proof at room temperature for 3 hours on the pan you plan to bake on.

partial truckload of bread for the market

About 30 minutes before the end of proofing, preheat the oven to 400 degrees. When ready to bake, take a sharp knife or a razor blade or lame, and make two or three slashes down the length of the bread. Load the bread into the oven and create steam by pouring a cup of hot water into a separate pan, or by spraying the walls of the oven with water. Bake for 35-40 minutes, rotating the loaves once. Let cool for an hour before slicing.

Chocolate Bread Madness!

Wednesday, June 30, 2010

Naan


Gyros, Taziki sauce and pitas- these are a few of of favorite things. Sadly, Augusta is very much lacking in the Greek Restaurant Realm. I did just find out about one restaurant- Dino's Chicago Express with two locations in Evans and Martinez, and there is a Greek Festival in October, but for now, I'm filling our gyro needs on my own.

I wanted to make the soft pita bread often found at Greek Restaurants, not the pockety kind. The closest thing I could tell to make was Naan, a yeasted and grilled flatbread bread usually found at Indian restaurants. The flavor was wonderful, but the Naan ended up about twice as thick as I wanted it to be. Maybe I should have rolled it even thinner to account for the rising on the griddle. If anyone knows a solution, or has a recipe for gyro pitas, I'd love to hear from you.

In any case, the Naan was delicious and would make a great accompaniment to many, many meals. I ate one and a half straight up plain even before we sat down to our meal.

Naan Recipe, found on Allrecipes.com

Allow about 3 hours for the finished product, but only about 30 minutes hands on time.

1 (.25 oz) packet of active dry yeast (i used instant yeast)
1 cup warm water
1/4 cup white sugar
3 T milk
1 egg, beaten
2 t salt
4 1/2 cups bread flour
2 t minced garlic (optional)
1/4 cup butter, melted

If using active dry yeast, soak the yeast in the water for 10 minutes, until bubbly. If using instant yeast, don't wait the 10 minutes after adding the water, just plow ahead. Combine the yeast-water with the sugar, milk, egg, salt and enough flour to make a soft dough. Knead for 6-8 minutes on a floured surface, until smooth, adding flour as needed.

Place the dough in an oiled bowl and cover with plastic wrap or a damp cloth and allow to rise for about an hour, until the dough has doubled in volume.

Punch down the dough and knead in the garlic, if using. Pull off pieces about the size of golf balls, roll into balls, and place on a tray to rise, covered, for about 30 minutes.


Preheat the grill to high. I used our pancake griddle.

Roll out a piece of dough into a thin circle. Lightly oil the grill. Grill 2-3 minutes, and brush the uncooked side before turning over and cooking an additional few minutes. Brush the cooked side with butter too because it is tasty stuff.

Continue the process with all your dough balls!

Our meal consisted of chicken cooked with oregano, thinly sliced red onions, tomatoes, bag cabbage mix and taziki sauce. And it was awesome.


Saturday, June 26, 2010

Oatmeal Bread


I'd been itching to make an oatmeal bread, as it is one of my favorite favorites. My last fall in Blacksburg, VA, I'd go to the farmer's market every week and buy the Oatmeal Bread from the bread vendors there. I lived on that bread, with Brummel and Brown spread and blueberry jam, until it was gone 2 days later. Not the healthiest diet, but a nice tradition nonetheless.

You can use a preferment, or just a piece of "old dough" to make this bread, but it's not necessary. The best part about the recipe is that you make what is basically a massive bowl of oatmeal to start out with. Well, my bowl of oatmeal is massive when baking for the restaurant. Yours might not be so big.

I found the recipe on the blog Farmgirl Fare. I'll include the recipe here, but you'll want to check out the Farmgirl blog because there's detailed dough shaping instructions, and in the comment section there's lots of good extra info about this recipe. I'd like to try making it here at home in smaller batches, because at the restaurant I have problems with the tops of my loaves splitting during the final rise, and I've tried both round free loaves and log shaped loaves in loaf pans. The loaves still taste awesome though.


This recipe make three pound and a half loaves, plus 10 oz of dough to save for your next batch. You can freeze this extra dough until you need it. You don't have to remove the extra dough, and you don't have to use this same kind of dough as your preferment. Heck, you don't even have to use a preferment, but it makes it better if you do.

4 cups hot water or milk
2 1/2 cups (11 oz) rolled oats (not instant)
1/2 cup (2 oz) oat bran
1/2 cup (3 1/2 oz) packed golden brown sugar
1/2 cup (1/2 stick, 2 oz) butter
1 T instant yeast
6 to 7 cups bread flour (about 2 pounds)
1 T salt
10 oz "old dough"

Stir together the oats, oat bran, brown sugar, butter and hot water. Let sit together for about 30 minutes, letting the mixture cool and enzymes develop.

Combine the yeast with 2 cups of flour and stir into the oat mixture. Stir and add flour one cup at a time until its dough-like enough to be kneaded on a well floured surface or in your mixer with the dough hook. Knead by hand for about 8 minutes or knead by hook for about 5. Cover the dough and let it rest for 20 minutes.

Knead in the salt and the old dough until they are completely combined; about 5 minutes.

Put the dough in a large bowl that have been sprayed with oil and dusted with flour. Dust the dough with flour, too. Cover the bowl with plastic wrap or a damp tea towel.

Let rise for an hour and a half at 70 or 75 degrees. If the room temperature is much coolor or warmer, the rise time will be slower or faster. When the dough is ready, you should be about to poke your finger deep into it and the indentation won't spring back.

Once the dough has risen, remove the 10 oz for the next batch, if desired. Put it in a ziplock bag and plop it in the fridge or freezer.

Now it's time to shape your loaves. I usually make round loaves. Here is a great description of how to shape a round loaf, with pictures.

Farmgirl makes log loaves and bakes in a loaf pan, and her post has good instructions on that. Here also is a site with pictures.

Once your loaves are shaped, brush the tops with water and sprinkle with oats. Or, as I did, put some oats on a plate and dip the top of your loaf in them. Very pretty.

Let the bread rise an hour more. You'll want the bread to be close to it's final size because this loaf doesn't have very much "oven spring," or it doesn't rise very much once in the oven. Again, try the finger indentation test.

Bake the loaves for 35 minutes at 375, or until golden brown and hollow sounding when the bottom is tapped. Remove from the pans and cool on a rack so the bottoms don't get soggy while cooling. Wait at least 40 minutes before slicing.

These loaves freeze well! They taste amazing toasted with butter and blueberry jam!!

Here's a shot of some of the bread goodies at the market.

Tuesday, May 25, 2010

Potato Rosemary Bread


Because of all the potato in it, this bread has remarkably tender crumb. The rosemary is just about the best herb when it comes to bread- it's spicy and floral and refined, and it feels like you're dumping a bunch of pine needles into your dough, which is kind of fun.

It does require a pre-ferment, so refer to the biga post for the recipe.

Potato Rosemary Bread, from the Bread Baker's Apprentice by Peter Reinhart
Makes 2 one pound loaves

1 1/2 cups (7 oz) biga
3 cups plus 2 T (14 oz) unbleached bread flour
1 1/2 t (.38 oz) salt
1/4 t black pepper (optional)
1 1/4 t (.14 oz) instant yeast
1 cup (6 oz) mashed potatoes
1 T olive oil
2 T (.25 oz) chopped fresh rosemary
3/4 cup to 1 cup (7 or 8 oz) water, room temp
4 T (1 oz) coarsely chopped roasted garlic (optional. I left this out.)


Take the biga out of the fridge about an hour before starting the bread. Cut it into about 10 pieces to help it warm up faster.

Stir together flour, salt, pepper and yeast in a large bowl or in your mixer bowl. Add the biga pieces, mashed potatoes, rosemary, oil and 3/4 cup water. Stir or mix on low speed until the ingredients come toether. Add more water if needed.

Knead for 10 minutes on a floured counter or mix in the mixer for 6 minutes. Add more water or flour as needed- the dough should be cohesive, pliable and tacky, not sticky.

Once the dough can be streched into a thin "windowpane" between your fingers with out tearing, then you can put the ball of dough into an oiled bowl and cover. And if you're adding garlic, you can flatten the dough and sprinkle it on top, then knead for another minute.

Let rise at room temperature for 2 hours, until the dough doubles in size.

Now shape the loaves. You can either form a "boule" circle loaf by creating tension on the top of the loaf by pulling the dough down and tucking underneath or make dinner rolls.

Proof for another hour or two until the loave doubles in size again.

Preheat your oven to 400 and brush the bread with olive oil. Bake the loaves for 20 minutes, rotate, and bake another 10-20 minutes. When done, the loaves will be golden brown and the temperature in the middle should be 195 degrees.

Cool for an hour before slicing.

Delicious with spaghetti, grilled, or straight up.

Monday, May 24, 2010

Walnut Bleu Cheese Sourdough

I've been experimenting with my sourdough starter recently. I'd like to understand what I"m doing, beyond feeding it once a week and adding more flour to the part I want to turn into bread.
I'm reading The Bread Builders by Daniel Wing and Alan Scott, which is a super-informative book about natural leaveners and hearth baking. To hear them talk, the only way to make real bread is to skip the yeast and fire in a hand built oven that burns wood. My boss keeps talking about moving the oven he built several years ago to the farm...I hope it happens. Then I could make real bread.

In the meantime, I offer Walnut Bleu Cheese Sourdough, which apparently is Peter Reinhart's favorite. I made it a couple weeks ago and Eric and I brought a loaf with us to Durham, North Carolina. (Along with some Potato Rosemary bread, which I will post next). This cool cat Gretchen who thinks blogs are lame lives there, and we like her enough to visit. (We like her a lot, actually) Our good friends Leah and Drew came too, and we had a blast. Leah has a blog, which I think is good reading. She and Drew build sweet things around their house.

The coolest part about this bread is the color! It's purple! Do you know why it's purple? You're thinking "The bleu cheese, duh" right? WRONG! It turned purple after I added the toasted walnuts and before the bleu cheese. Weird, I know. It's the oils in the walnuts.

For this bread, make your sourdough as you normally would, and add 25 percent toasted walnuts and 15-20 percent crumbled bleu cheese. This will seem like an absurd amount, breaking and spilling out of the dough at every side, but it will work in the end, even if it requires some guerilla shaping of the loaves. Add the walnuts during the last two minutes of kneading and fold in the bleu cheese carefully at the end of kneading. (Press out the dough and sprinkle one third of the cheese on it, roll it up and repeat this two more times.)

As soon as I really, truly figure out this sourdough thing, I'll post my findings, but in the mean time you can check out The Bread Baker's Apprentice by Peter Reinhart (which is a must have bread book. The Authority, some say.)

Here are links to his sour dough bread recipe

(note: if you don't have hours and hours to let your bread rise, or if your starter is new, you can add 1 1/2 teaspoons instant yeast to the bread to ensure a 90 minute first rise and a 60 minute final proof. Is this cheating? Opinions differ. You decide. Bear in mind that the bread is definitely less sour if you use yeast.)

...but I recommend buying the book so you can read all about bread and how to bake it.


MMmmm, we grilled the bread with butter for dinner at Gretchen's house. We ate it with local spinach, sausage and chutney.

This post was submitted to Yeastspotting

Wednesday, March 31, 2010

Bread Glory Shots


Here is the bread i made on friday, shining brightly in the morning light! I arrived at 4:45 and left at 9:30. I absolutely adore arriving early, when it's still dark and I'm all alone and free to listen to music...or Twilight or Harry Potter audio books. Getting out of bed is tough, and it's kind of scary going to the storage garage in the dark and lugging a 50 pound bag of flour across the street, but once I get the dough going, I don't notice the time until others start arriving around 9, and I snap my computer shut so they don't hear what I'm listening to.

For our country loaf, the ingredients are flour, water, yeast, salt and olive oil.

This is the massive mixer that kneads 50+ pounds of dough for me. Every time I make bread I clean it out, and every time there are 3 little screws at the bottom, which I take out and put in a grove on the top in case some body needs them. Then the next time, they're back in the bottom of the bowl. It's like someone wants there to be screws in the bread. On Monday I just went ahead and threw them out.

This was the dough for the honey wheat bread (Carol Kroeger recipe). It swelled to the top of the bowl before I had a chance to form loaves with it. The restaurant is always very hot in the morning, and the temperature makes the dough rise like whoa.

Here I am making hundreds of little rolls. The rolls are so much more work...I kind of hate them. But they are nice to eat. After cutting the 2-3 oz pieces, I let them rest for a few minutes before shaping them.

This is the rack where they bread trays go. Behind it is the oven.

Ah! The finished product! I like my baguettes all rustic and bulgy like this.

The honey wheat boules turned out very pretty and very delicious. The customers won't know what hit em!

All those little rolls...I think I figured I made over 400 of the little buggers. Instead of slicing them with a knife, I usually snip the tops with scissor, which gives them sharp little noses when they're baked.

I love this. I love making bread.

I've been working on a sourdough starter all week, so look for some sourdough bread soon!