Sunday, February 21, 2010

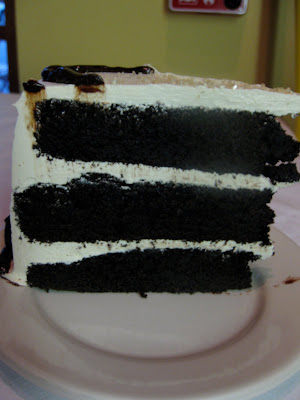
Chocolate Cake with Brown Sugar Frosting


This is a recipe by Sky-High Cakes. The chocolate cake is very good and moist, and easy. There aren't really any tricky tricks like melting chocolate to make it gruesome. It is a good recipe for the chocolate cake and vanilla frosting combination.

For the cake:
1 cup unsweetened cocoa powder
1 1/4 cup hot water
3 cups packed brown sugar (helps keep it moist)
2 2/3 cup cake flour (I used 2 1/4 AP flour and the rest cornstarch because I was out of cake flour. It worked very well, according to my little test cupcake.)
1 1/2 t baking soda
3/4 t salt
2 sticks plus 2 T unsalted butter, softened.
3 eggs
1 1/2 t vanilla
3/4 cup cold water


Preheat the oven to 325 F. Butter and line 3 8 or 9-in round cake pans with parchment circles.

Place the cocoa powder in a medium bowl and add the hot water. Whisk til smooth and set aside to cool.

In the bowl of an electric mixer, combine the brown sugar, flour, baking soda and salt. With the mixer on low, blend to mix. Add the butter and the dissolved cocoa and beat briefly to blend. Then raise the speed to medium and beat until fluffy, about 2 minutes. (See? So easy. No "add in alternating additions" stuff).

In a medium bowl, whisk the eggs, vanilla and cold water until blended and added gradually to the batter, scraping the bowl as needed. Divide the batter among your three pans and smooth the tops.

Bake for 35-40 min (it will be less if you use 9-in pans, so check early). It's done when the tester comes out almost clean.

Let cool for 15 minutes in the pan and then cool completely on wire racks

Make your brown sugar frosting.

boiling the sugar and water

To me, brown sugar frosting sounds homey and rich and maybe a little caramelly, but it mostly tasted like regular vanilla buttercream. Next time I'm going to try using dark brown sugar, or maybe even muscovado sugar to give it more depth. Or I could try making brown sugar caramel frosting. Or adding a spice like cinnamon, or even some citrus zest. The possibilities are endless.

Brown Sugar Buttercream:

5 egg whites
1 1/4 cups packed brown sugar
1/4 cup water
1 pound (4 sticks) unsalted butter, softened but not mushy.

Place the egg whites in the bowl of an electric mixer fitted with the whisk attachment.

In a medium saucepan, combine the brown sugar and water. Bring to a boil and cook until the temperature reaches 238 F on a candy thermometer.

A few minutes into the boiling of the sugar, start beating the eggwhites; beat until soft peaks form and then, while the whisker is whisking, slowly pour in the hot sugar syrup. Beat at med-high until the sides of the bowl aren't hot anymore.

Drop the speed to medium-low and add the butter one tablespoon at a time. When all the butter is added, raise the speed to medium and beat the frosting until smooth. Don't worry if it appears to curdle, just keep beating.

I froze my layers a couple hours beforehand, which always makes frosting easier. It makes refrigerating between the crumb coat and the final coat almost unnecessary, especially with this type of frosting.

To decorate, I sprinkled turbinado sugar on top and piped chocolate ganache around in loopy loops.

Saturday, February 20, 2010

Orange Chocolate Chunk Cake


Every week I'm supposed to make 3 cakes for the restaurant; two layered, iced cakes, and one uniced cake.
I'm really enjoying making the uniced cakes. They are way less stressful than the frosted cakes, and I love a cake you can eat warm. I usually try some combination of fruit and often chocolate like here, here and here. These are the types of cake that you can eat slice after slice and not feel you've over-indulged! (you decide if this is good or bad.)

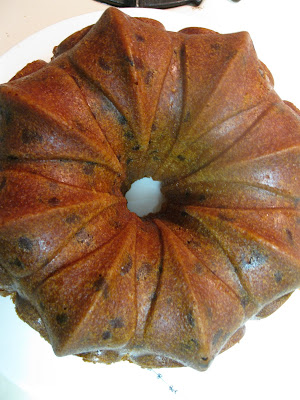
Today I present to you Ina Garten's Orange Chocolate Chunk Cake (from Barefoot Contessa Parties!), found on Leite's Culinaria. This extremely moist cake boasts bright orange flavor and smooth, sweet chocolate, and can be baked in loaves, bundt pans or cupcakes. This cake could be yours for your very own this weekend!

four naked oranges and a pile of zest

Ingredients:
2 sticks unsalted butter, room temperature
2 cups sugar
4 extra-large eggs (I used most of 5 large eggs)
1/4 cup orange zest (from 3 or 4 orange)
3 cups AP flour, plus 2 T, separated
1/2 t baking soda
1/2 t baking powder
1 t salt
1/4 cup fresh squeezed orange juice
3/4 cup buttermilk
1 t vanilla
2 cups good quality semi-sweet chocolate chips/chunks

For the syrup:
1/4 cup fresh squeezed orange juice
1/4 cup sugar

For the ganache (optional):
8 oz good-quality semi-sweet chocolate chips
1/2 cup heavy cream
1 t instant coffee (optional)

mmm fresh orange juice

Preheat oven to 350. Butter and flour a bundt pan.

Cream the butter and sugar in an electric mixer for 5 minutes, or until light and fluffy. Add eggs one at a time, then the orange zest.

Sift together 3 cups of flour, baking soda, powder and salt. In another bowl, combine the vanilla, orange juice and buttermilk. Add the flour and buttermilk mixtures, alternating in three additions, beginning and ending with the flour.

Toss the 2 cups of chocolate with the 2 tablespoons of flour (to make sure it doesn't sink through the cake to the bottom). Stir the chocolate into the cake batter, then pour into the pan, smooth the top and pop into the oven. Bake for 45 minutes to an hour until a tester comes out clean.

I did not wait long enough to remove my first cake...I've realized my lovely bundt pan retains heat longer than usual, so I now I wait about 3 hours before attempting to remove it. Your pan might be different than mine...the recipe recommends only waiting 10 minutes before removing.

The upside of this was that we got to eat the first cake at the restaurant and it was to die for.

prematurely removed cake wreckage.

It is best to apply the syrup while the cake is warm. Make the syrup by boiling together the 1/4 cup OJ with the 1/4 cup sugar and spoon or brush over the cake.


Beautiful, whole, chocolate-speckled orange cake.

Let the cake cool completely. If desired, melt the chocolate, cream and coffee together and pour over the cake. I think it is plenty chocolatey without the ganache.

Wednesday, February 17, 2010

Flan


I love flan. It's true.

In college my roommates would open the fridge to find that almost every single mug we owned was half full of this delightful custard. The best part was...they didn't really care for it, so it was all mine!

I could go days just eating this stuff. In fact, I made it yesterday and it's been featured as the main part of my every meal since. Healthy? No. Delicious? Absolutely.

I used "The Perfect Flan" recipe on Epicurious from Bon Appetit.
I don't think I'd call it the perfect flan; I've had better. It was very good though.

Ingredients:

1 3/4 cup whipping cream
1 cup whole milk (I substituted evaporated milk, following the advice of some of the commenters.)
pinch of salt
1/2 vanilla bean, split lengthwise (whoops. I just realized I used a whole one. It obviously didn't hurt it though.)

1/3 cup water
1 cup sugar

3 large eggs
2 large egg yolks
7 tablespoons sugar

Preheat oven to 350. Assemble 6 or 7 ramekins or custard cups. Combine cream, milk and salt in a medium saucepan and bring to a simmer over medium heat. Set aside to steep for about 30 minutes.

Meanwhile, combine the cup of sugar with 1/3 water in another medium saucepan. Stir over low heat until sugar dissolves, then cook over high heat without stirring (you can swirl it if you want to though) until the caramel is deep amber (I would remove it before it gets to this point because it will continue to darken a bit once off the heat.)

Working quickly, divide the caramel among the ramekins, tilting them to coat the sides. Careful, it's reeeaaallly hot. Set the ramekins into a 13x9 in baking pan.

Whisk the eggs, yolks and remaining sugar until just blended. Gradually whisk in cream mixture, trying to create as little foam as possible. Pour this mixture through a fine sieve into the prepared ramekins. Pour enough hot water into the baking pan that it comes half way up the sides of the ramekins.

Bake until loosely set, about 40 minutes. Remove from oven and let cool. Cover and refrigerate at least 3 hours, preferably over night.


To serve, run a knife around the edges of the flan and shake out onto a plate, letting the caramel run down over the flan.


I guess the hardest part about making flan is the caramel. It's not really hard though, just finicky. And flan without the caramel is just not worth the calories.

Monday, February 15, 2010

Carrot Cupcakes


Friday night was very eventful. I was standing in our kitchen washing baking dishes when I saw that it was raining.

Except that it wasn't raining- it was SNOWING!

It kept snowing, and sticking, too, until the early morning. To my knowledge, the last time it snowed here was like 7 years ago, so this is something extraordinary. I've been quietly jealous of my friends in Virginia who've had nothing but snow this winter; while I watched the snow falling thick and fast, I felt my body relax, like I'd been holding my breath for it all winter.

So all that was good, except we had to drive to Columbia in 2 hours for Spencer and Liz's Engagement Potluck, and my first batch of cupcakes just failed miserably.

I made carrot cupcakes from this carrot cake recipe on Epicurious. It got rave reviews so I figured it was a sure thing. I hummed along, using the shredding attachment on my food processor to reduce a pound of carrots to a fluffy pile in seconds. You can use it on cheese, too! Or with the slicing disk to make sweet potato chips! It's like magic!

Before they went in the oven:

After the oven:

Oh, devastation. Cupcake craters. I am blaming this on the fact that it was a cake recipe and maybe had too much leavening for cupcakes, and also maybe I didn't use enough carrots. The recipe called for 3 cups grated carrots, about a pound. Well, I shredded two carrots and got 3 cups and just used that. When I tried my second recipe I weighed the carrots and realized maybe I should've used double or more carrots the first time.

Time was ticking away, but I searched the world wide web for a specifically carrot CUPcake recipe and thank heavens I did because I found a recipe with a truly amazing taste that produced perfectly domed little cupcakes that looked like this after icing:


Mmmm, they had cardamon and orange zest in them. Just thinking about it makes me want to make another batch.

Carrot Cupcakes from Simply Recipes, by Garret McCord from Vanilla Garlic
(I omitted the walnuts because I am not one for nuts in my baked goods)

1 cup chopped walnuts
1 pound carrots
3 large eggs
1/2 cup buttermilk
1 t vanilla extract
2 cups sugar
1 cup vegetable oil
1 T orange zest
3 cups AP flour
1 t baking soda
2 t baking powder
1 t salt
2 t ground cardamon
1 t ground cinnamon

Preheat the oven to 350. Toast the walnuts for 5 minutes, if using.

Rinse and peel the carrots, then roughly grate. (Food Processor!)

Place carrots, eggs, buttermilk, vanilla, sugar, oil and orange zest in a bowl and stir/whisk thoroughly.

In another bowl, sift/whisk the flour, baking powder and soda, salt, cardamon and cinnamon.

Fold the flour mixture into the carrot mixture. Don't over mix. Fold in the walnuts, if using.

Scoop into cupcake papers, filling 1/2-3/4 of the way full. Bake for 19-21 minutes, being sure to rotate the pans after the first 15 minutes. Allow the cupcakes to cool slightly before removing to cool completely on racks.

Frost with Cream Cheese Frosting:

Mix 2 sticks softened unsalted butter with 16 oz softened cream cheese. Gradually add powdered sugar to taste. I used about a pound.

It was pretty stressful driving through the heavy snow to Columbia. It took us about 45 minutes longer than it usually would. We made it though, and after most people left, we had a cupcake photo shoot with Spencer and the beautiful Liz.

The cupcakes were a big hit at the party! I think my carrot cupcake recipe search is over!


"Whiteout" Cake

And here is your final Valentine's Cake; the "White-Out" Cake from Baked. White Chocolate frosting, vanilla cake.


Friday, February 12, 2010

Chocolate-Raspberry Cake, version two.


Valentine's Cake two is another take on Chocolate Raspberry Cake, which I made once before, here.


It's a similar cake, except the chocolate cake recipe I used is the one from Baked which I posted for the Sweet and Salty Cake. I used Martha's Dark Chocolate Frosting again, which I'm realizing is a real favorite. I love that it used chocolate and powdered sugar and cocoa powder and butter. It's like the best of all the frostings combined. This time, I used 1 pound semi-sweet chocolate, and half pound dark. I used salted butter and omitted the salt in the recipe, and boy howdy, the results were fab. Smooth and dreamy.

I froze my layers before I used them, which made assembly like, 20 times easier. The layers aren't as fragile and the chocolate frosting hardens in place (so no sliding!).

I spread a thin layer of frosting on the first two layers, then spread a thin layer of Smucker's seedless raspberry jam on top of the frosting.

I assembled the cake, applied the crumb coat and let it set.

When spreading the finale layer of frosting I made it as smooth as possible because I wanted to be able to focus on decorating. We cut our cakes into 12 slices at the restaurant, so made some marks dividing each slice and piped a looping vine of chocolate around the perimeter and side of the cake.

I mixed 1/3 cup melted white chocolate with a tablespoon seedless raspberry jam and piped it onto the cake in pretty pink hearts. Every slice gets a heart!


I think it's ADORABLE. My personal Valentine to the chocolate loving patrons of the Restaurant.

Red Velvet Cake


This Red Velvet Cake begins a small series of cakes devoted to Valentines Day.

Cakes that look and taste like love.

Cakes that say, "If you eat me, you will fall in love tonight."


At least, you'll fall in love with cake tonight.

I used a recipe from Pinch My Salt, another great food blog out there.

I was pleased with the results: a moist, very red cake. (and I only added 1.5 oz red food coloring, when the recipe called for 2. And ounce of food coloring may not sound like very much, but it's a whole bottle, people!)

The recipe specifies sifting the cake flour before measuring, and then again with the dry ingredients. The way I measure flour now in general is pouring it into the measuring cup from another container and then leveling the top. In general this gives a more accurate measure, though the recipe may indicate the method preferable. I think many people inadvertently end up with too much flour in their batters when they scoop because it can pack too much in the cup measure. This will result in drier cakes.

My favorite method is weighing, though. I wish more recipes listed ingredients by weight. Which reminds me, I need a new battery for my kitchen scale.

Ingredients:
2 1/2 cups sifted cake flour
1 t baking powder
1 t salt
2 T cocoa powder (unsweetened)
2 oz red food coloring
1/2 cup unsalted butter, room temp
1 1/2 cup sugar
2 eggs, room temp
1 t vanilla extract
1 cup buttermilk, room temp
1 t white vinegar
1 t baking soda

Preheat to 350. Butter and flour 2 9-in round cake pans.

Sift together cake flour, baking powder and salt into a medium bowl and set aside. In a small bowl, mix together food coloring and cocoa powder to form a smooth, thin paste. I like this part. It feels like mixing paint.

In a large bowl, using a mixer, beat butter and sugar together until fluffy, 3-5 minutes. Beat in eggs, one at a time, then vanilla, then the red cocoa paste, scraping the bowl as needed. Add one third of the flour mixture, then 1/2 the buttermilk and so on, alternating the two. Scrape and beat well.

Keep your prepared pans close and combine the baking soda and vinegar in a small bowl. Add it to the cake batter and stir until well combined. Now, you want to get these cakes into the oven as fast as possible now, so divide between your pans quickly. Bake for 25-30 min (mine may have taken closer to 20; our oven runs hot). Check early and remove when a poking implement poked in the center of the cake comes out clean.

Cool the cakes for 15-20 minutes and remove to a wire rack. Let cool completely before frosting with Cream Cheese Frosting!

Cream Cheese Frosting

My general recipe involves 1 pound of cream cheese, 2 sticks of butter, vanilla and almost 2 pounds of confectioners sugar. This time I reigned in the sugar a bit and I liked the result of a thinner, tangier frosting. So beat together your softened cream cheese and butter, beat in 1 or 2 t of vanilla, then gradually add SIFTED confectioner's sugar until you have the taste and consistency you like.

When frosting a red velvet cake, the crumb coat is especially important, especially if you trim the layers to make them even. Those little red crumbs are just dying to show up on the surface, so trap them in a thin coat of frosting and refrigerate for 10 minutes or so before smoothing on your final layer of frosting.

Crumb coat:

Because it's V-day week, I wanted to put a heart of crumbs on top of my cake for decoration. I frosted the top as smooth as possible, then cut a heart out of the middle of a 9-in circle of parchment paper. I froze the cake while I messed with the paper so the icing wouldn't be as sticky.
I placed the heart paper on top of the cake and patted crumbs I got from trimming the layers on to the frosting in the heart-shape.

When I had a nice, thick coat of crumbs, I carefully peeled back the paper and Voila! Heart cake.